|
There are currently no product reviews.
 ;
Good quality, the manual help me to repair the echo/reverb section
;
A good service manual with lots of info and a very fair price
;
Great value, good scan, just as expected, everything that you need.
;
Good scan, great price, but almost the same with the SV260 service manual.
;
This PDF is very comprehensive. It includes drawings, parts lists, schematics, pictures, PCB drawings, mechanical layouts, etc. for all three stackable equipment. The scans are good too. Easy to read and no smudges or black lines. I have no complaints. I will make this site my first stop for finding my service manuals.
10-2
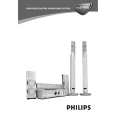
Emergency opening of the trays
The trays of the 5DTC are mechanically locked. Release snap as shown in picture 5 and pull tray out.
To open tray 1, 2 and 3 move lever (pos 29) backwards (e.g. with a screwdriver - see picture 2) to its endposition.
To remove a CD from Play Position perform following steps: 1. Open tray 1 as described before. 2. Tear the tray out with speed (see picture 6). The tray can be inserted aftewards without any alignment.
Release the locking mechanism and pull out the tray (see picture 3).
3. Move lever (pos 29) forward to its endposition (see picture 4). 4. Push lever (pos 31) forward (see picture 7).
To open tray 4 and 5 move lever (pos 29) forward to its endposition (see picture 4).
5. Remove CD.
|