|
There are currently no product reviews.
 ;
the manual is great and especially hard to find... thanks for the great service and having a hard to find manuel_
;
Please tell us what you think and share your opinions with others. Be sure to focus your comments on the product. You will receive $2.50 of store credit for Your review.
;
hat alles sehr gut geklappt. Das Servicemaual ist gut zu verwenden. Die Pläne und Schrift
ist klar und leserlich. Außerdem preiswert. Grüße an alle Hifi-Bastler
;
I got the manual quickly after the payment was transfered (1 day). The manual was exactly what i needed and the updates via e-mail were great. Thanx!
;
I've looked for this manual all over that internet, you guys had it and to a good price. A++++
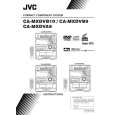
MX-DVB9 Removing the cams R1/R2 assembly and cam gear L (See Fig.23)
Slit washer 1. Remove the slit washer fixing the cams R1 and R2 assembly. 2. By removing the two pawls "S" fixing the cam R1, separate R2 from R1. 3. Remove the slit washer fixing the cam gear L. 4. Pull out the cam gear L from the C.G. base assembly. Cam gear L Slit washer Cam R2
11
Pawl S Pawl S Cam R1
Removing the C.G. base assembly (See Fig.23, 24)
Remove the three screws 11 retaining the C.G. base assembly. [Caution] To re-assemble the cylinder gear, etc. with the cam unit (cam gear and cans R1/R2 assembly), gear unit and drive unit, align the position of the pawl "N" on the drive unit to that of the notch on the cam gear L. Then, make sure that the gear unit is engaged by turning the cam gear L (See Fig. 24).
Cam switch board C.G. base assembly
Fig.23
Cam gear L Cam R1, R2 assembly
Notch
Pawl N Cylinder gear
Gear unit
Drive unit
Gear bracket
Fig.24
1-22
 $4.99 MX-DVB9 JVC
Owner's Manual Complete owner's manual in digital format. The manual will be available for download as PDF file aft…
|