|
|
|
Categories
|
|
Information
|
|
Featured Product
|
|
|
 |
|
|
There are currently no product reviews.
 ;
We received the manual in a timely manner and it was exactly what we were expecting. Excellent replacement for original Service Manual.
All schematics are very legible. We are really satisfied.
;
We received the manual in a timely manner and it was exactly what we were expecting. Excellent replacement for original Service Manual.
All schematics are very legible. We are really satisfied.
;
We received the manual in a timely manner and it was exactly what we were expecting. Excellent replacement for original Service Manual.
All schematics are very legible. We are really satisfied.
;
We received the manual in a timely manner and it was exactly what we were expecting. Excellent replacement for original Service Manual.
All schematics are very legible. We are really satisfied.
;
We received the manual in a timely manner and it was exactly what we were expecting. Excellent replacement for original Service Manual.
All schematics are very legible. We are really satisfied.
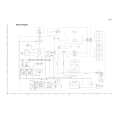
MX-G50
Removing the CD Tray fitting (1) (See Fig. 4 to 6)
Prior to performing the following procedure, remove the metal cover. 1. Press the POWER button. Press the OPEN/CLOSE button to eject the CD tray. 2. After drawing the lower part of the tray fitting toward the front, remove the five claws a. Then, while moving the tray fitting upward, remove it. 3. Press the OPEN/CLOSE button to insert the tray. Fig.4
POWER button
CD tray
OPEN/CLOSE button
Joint
CD tray fitting
Removing the CD Tray fitting (2) (See Fig. 5 to 7)
- How to eject the CD tray without turning on power 1. Turn the black loading pulley gear marked b from the back of the CD changer unit as shown in Fig.7 and draw the CD tray toward the front. 2. After drawing the lower part of the tray fitting toward the front, remove the five claws a. Then, while moving the tray fitting upward, remove it. 3. Push and insert the CD tray manually.
(See Fig. 24) Claw a
Fig.5
CD tray
This slot of the board. b (Loading pulley gear)
Fig.7
Fig.6
1-6
 $4.99 MX-G50 JVC
Circuit Diagrams Set of circuit diagrams. The diagrams will be provided as PDF file. The file will be delivered after…  $4.99 MX-G50 JVC
Parts Catalog Parts Catalog only. It's available in PDF format. Useful, if Your equipment is broken and You need t…
|
|
|
> |
|