|
|
|
Categories
|
|
Information
|
|
Featured Product
|
|
|
 |
|
|
There are currently no product reviews.
 ;
Thanks to this service manual I repaired my old camcorder! The manual perfectly explains how to disassemble the camcorder step by step.
;
This manual is very useful because it presents the technical specifications of the cd player, including the manufacturer of the reader, this helps if you need to replace it. It also displays the settings and layout of the circuit.
;
Manual was a good representation of service infomation for the EWV404. It worked well for my repair.
 ;
Great quality copy, right what I was looking for, all I need to fix my radio.
Thanks
;
I BOUGHT A PAIR OF INFINITY VINTAGE SPEAKERS THAT REQUIRED TO BE REPAIRED AND THE ELECTRONIC TECHNICIAN ASKED ME FOR THE SERVICE MANUAL.
I TRIED TO GET IT AT THE MANUFACTURER'S SITE WITH NO SUCCESS, SO I STARTED TO LOOK FOR IT IN THE WEB FOR A LONG TIME, UNTIL I FOUND THE SERVICE MANUAL IN THIS EXCELLENT SITE "OWNER'S MANUAL.COM".
NOW I HAVE MY SPEAKERS WORKING AND ENJOYING THE MUSIC I LIKE.
THANKS TO "OWNER`S MANUAL.COM" I RECOMMEND THIS SITE TO EVERYONE.
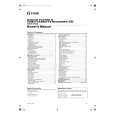
MX-J570V/MX-J680V <Rear panel assembly> Removing the tuner board (See Fig.21 and 22)
Prior to performing the following procedure, remove the metal cover and CD changer mechanism assembly. 1. Remove the two plastic rivets attaching the joint board, and remove the joint board. 2. Disconnect the card wire from connector CN1 on the tuner board. 3. Remove the two screws Y attaching the tuner board on the back of the body.
CN912 CN315 CN712 Joint board Plastic rivets CN870 CN1 Tuner board Rear panel CN871
CN612
Z
Input / output board
CN711
Fig.21
Removing the input / output board (See Fig.21 and 22)
Prior to performing the following procedure, remove the metal cover and CD changer mechanism assembly. 1. Remove the two plastic rivets attaching the joint board, and remove the joint board. 2. Disconnect the card wire from connector CN315 on the input / output board. 3. Disconnect the harness from connector CN912 on the input / output board. 4. Remove the screw Z attaching the input / output board on the lower side of the body. 5. Disconnect connector CN612, CN870, CN871, CN711 and CN712 on the input / output board and pulling out them outward. Remove the input / output board from the body.
Rear panel
Y
G
E
Fig.22
1-13
 $4.99 MXJ680V JVC
Owner's Manual Complete owner's manual in digital format. The manual will be available for download as PDF file aft…
|
|
|
> |
|