|
There are currently no product reviews.
 ;
perfect! you just sent to me the copy in Italian witout even my specification!!!! so you are really smart cooperative and efficient. To my opinion the best place all over to get a manual of electronics!!!!
;
Well Well Well!!!! Good manual perfect for my hobby!!! As Before you have done a very well done work!!!! Thank you
;
Super nice! Good to have a manual in digital format.
;
Great job supplying the manual.
Many of these products weerepretty obscure, so it was great that you had
the manual for it!
;
Great manual, would not have been able to operate my machine without it!!
James Dawson August 18, 2012
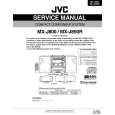
MX-J100 Removing the CD Tray fitting (See Fig. 4 to 6)
Prior to performing the following procedure, remove the top cover and the side covers.
POWER button
CD tray
OPEN/CLOSE button
ATTENTION: Be sure to remove the CD tray fitting before removing the CD changer unit. 1. Press the POWER button. Press the OPEN/CLOSE button to eject the CD tray. 2. Move the CD tray fitting upward and release the joint b. 3. Press the OPEN/CLOSE button to insert the tray.
Joint b CD tray fitting
Fig.4
Removing the CD Tray fitting (See Fig. 5 to 7)
- How to eject the CD tray without turning on power 1. Turn the black loading pulley gear marked c from the back of the CD changer unit as shown in Fig.7 and draw the CD tray toward the front. 2. Move the CD tray fitting upward and release the joint b. 3. Push and insert the CD tray manually.
Joint b
Fig.5
CD tray
Marked c Loading pulley gear
This slot of the board.
Fig.7
Fig.6
1-6
 $4.99 MXJ850R JVC
Service Manual Complete service manual in digital format (PDF File). Service manuals usually contains circuit diagr…
|


