|
|
|
Categories
|
|
Information
|
|
Featured Product
|
|
|
 |
|
|
There are currently no product reviews.
 ;
Good quality (clearly readable) manual, I'm glad I could find it here, at a bargain price!
;
Speedy transaction with a quick download. Awesome hassle-free service.
;
very poolite and healpful secure transaction thanks allot
;
- Very good scan quality, PERFECT!
- Sehr gute scan Qualitaet, empfehlenswert!
Wolfgang Sundhaus
 ;
Good site, works ok and you get what you order, no problems experienced, got my manual within a day. A++++
MX-KA6
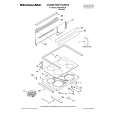
Removing the power amp and supply PCB and the power trans PCB (See Fig. 2, 29 to 31)
Prior to performing the following procedures, remove the top cover and CD changer unit. 1. Remove four screws B from the rear panel. (Fig.3) 2. Pull the heat sink cover outward. 3. Remove four screws AA from the rear panel between the heat sink holder. 4. Remove two screws X that retain the speaker terminals and AUX terminal. 5. Remove screws YY that retains the rear panel, and then remove the rear panel. 6. Disconnect the parallel wires from the connectors FW951 on the power trans PCB. 7. Remove the clamp of AC power cord from the chassis. 8. Remove four screws AB that retain the power trans PCB and then remove the assembly.
Fuse (F952) T3.15A 250V Fuse (F951) T1.6A 250V
AA
X
Fuse (F953) T1.25A 250V
Fig.29
Clamp
YY
Fig.30
Rear panel
AB Power amp and supply PCB
Chassis
Fig.31
1-17
|
|
|
> |
|