|
|
|
Categories
|
|
Information
|
|
Featured Product
|
|
|
 |
|
|
There are currently no product reviews.
 ;
It is perfect, exactly what we needed. It's like the paper version but less clutter.
 ;
Received my manual within 24 hours. Very clear scan of the manual I needed. Thanks!
;
Very clear scan, I recommend it. Definitely a must have for any 3362 owner.
Alpine could have written a slightly more complete manual, though. It's already pretty huge, but the unit has so many functions, I feel some more explanation would have been better.
Yamaha's manual of their comparable YDSP-1 is a little better in my opinion.
;
Immediate response with excellent service - highly reccommended
;
Correct manual received and of good quality but the contents of the file for the Service Manual for the same monitor is for a 20" TV not the RGB Monitor.
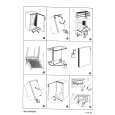
Using the Timers
English
Using the Unit You can set the time in the same way as for setting the Daily Timer.
8
1 2
Insert a blank or erasable tape into the Deck B and wind past the tape leader. Press the CLOCK TIMER button until �ON TIME� immediately after �REC� appears on the display.
Each time you press the button, the display changes as follows: DAILY = ON TIME = REC = ON TIME* = Clock setting display = Canceled = (back to the beginning)
*: This item should be selected for the REC Timer setting.
Press the STANDBY/ON button to turn off the System, if necessary.
The Timer indicator ( ) and �REC� indicator are lit on the display, showing that the REC Timer is set to on. To confirm / change the timer setting, repeat the setting procedure from the beginning. When the timer ON-time comes: � When the timer ON-time comes, the System automatically turns on. The station you have set is played. The �REC� indicator lights up and the Timer indicator ( ) and the Tape Indicator (3) blinks during timer operation. To stop timer recording, press the 7 button. � When the timer OFF-time comes, the System automatically turns off.
Then, the System enters ON-time setting mode. The current ON time appears on the display and the hour digits, �REC� indicator blinks and the Timer indicator ( ) lights up.
� If the System is already on when the timer ON-time comes, the REC Timer does not work.
Turning the REC (Recording) Timer On and Off
Once you have set the REC Timer to record a source, the timer setting is stored in memory. So, though the REC Timer turns off once it is used, you can recall it at any time.
3
Setting the ON time you want the System to turn on.
To cancel the REC Timer temporarily:
1. Press the 4 or ¢ button to set the hour, then press the SET/DISPLAY button. 2. Press the 4 or ¢ button to set the minute, then press the SET/DISPLAY button. �OFF TIME� appears and then the System enters OFF-time setting mode. The current OFF time appears on the display, and the hour digits blink.
1
Press the CLOCK TIMER button on the Unit repeatedly until �REC� appears on the display.
The Timer indicator ( blinks on the display. ) lights up and the �REC� indicator
2
Press the CANCEL/DEMO button on the Unit.
�OFF� appears and both the Timer indicator ( �REC� indicator go out. ) and the
4
Setting the OFF time you want the System to turn off.
1. Press the 4 or ¢ button to set the hour, then press the SET/DISPLAY button. 2. Press the 4 or ¢ button to set the minute, then press the SET/DISPLAY button. The System enters Preset Station Entering mode.
To activate the cancelled REC Timer:
1
Press the CLOCK TIMER button on the Unit repeatedly until �REC� appears on the display.
The Timer indicator ( blinks on the display. ) lights up and the �REC� indicator
5
Select the preset station for recording.
1. Press the 4 or ¢ button to set the band (TUNER FM or TUNER AM), then press the SET/DISPLAY button. 2. Press the 4 or ¢ button to set the preset number, then press the SET/DISPLAY button.
2
Press the SET/DISPLAY button on the Unit.
�ON� appears on the display. The Timer indicator ( ) and the �REC� indicator remain lit, and the display returns to the original display.
6
Setting the volume level.
� If the System is unplugged, or a power failure occurs, the timer setting will be lost in a few days. You will need to reset the clock first, then the timer.
Press the ¢ or 4 button to select the volume level. MIN, 1-26, or MAX: When the timer is turned on, the Volume will be automatically faded into the selected volume level. � When the volume level is set to MIN, no sound comes out of the speakers.
7
Press the SET/DISPLAY button.
The timer setting is completed, the display returns to the display before you set the Timer.
23
|
|
|
> |
|