|
|
|
Categories
|
|
Information
|
|
Featured Product
|
|
|
 |
|
|
There are currently no product reviews.
 ;
I am proud of you. In the future, I benefited from your services.
;
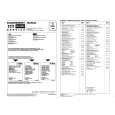
I found this manual to be complete in every detail. Besides the schematic it has a complete set of alignment instructions which are easy to understand. It also includes a complete parts list as well as an explanation of how the power supply and safety shutdown circuits operate. Even a schematic of the tuner is included.
 ;
The product was good and just what I needed, however I had moderate difficulty with the down load because the sight would not recognize my pass word. I was finally given a direct link to the manual and that worked.
;
Very quick and easy website to use and fast download of manual, quality of manual is excellent and will be pleased to use this service again in the future, thanks so much!
;
It is an very good and clear scanned service manual.
very recommended.
MZ-R500/R500PC
47. Adjust with the [VOL+] key (adjusted value up) or [VOL--] key (adjusted value down) so that the adjusted value becomes 1C.
This set LCD display
59. Adjust with the [VOL+] key (adjusted value up) or [VOL--] key (adjusted value down) so that the adjusted value becomes D3.
This set LCD display
0 230D6D1C
1C: Adjusted value
0 2 30D73D3
D3: Adjusted value
48. Press the X key. (0D6D is blinking) 49. Press the [VOL+] key once to change the blinking portion to 0D6E.
This set LCD display
60. Press the X key. (0D73 is blinking) 61. Press the [VOL+] key once to change the blinking portion to 0D74.
This set LCD display
0 2 30D6E00
00: Adjusted value
0 2 30D7400
00: Adjusted value
50. Press the x key. (00 is blinking) 51. Adjust with the [VOL+] key (adjusted value up) or [VOL--] key (adjusted value down) so that the adjusted value becomes 03.
This set LCD display
62. Press the x key. (00 is blinking) 63. Adjust with the [VOL+] key (adjusted value up) or [VOL--] key (adjusted value down) so that the adjusted value becomes F8.
This set LCD display
0 2 30D6E03
03: Adjusted value
0 2 30D74F8
F8: Adjusted value
52. Press the X key. (0D6E is blinking) 53. Press the [VOL+] key to change the blinking portion to 0D72.
This set LCD display
64. Press the X key. (0D74 is blinking) 65. Press the [VOL+] key once to change the blinking portion to 0D75.
This set LCD display
0 230D7200
00: Adjusted value
0 2 30D7500
00: Adjusted value
54. Press the x key. (00 is blinking) 55. Adjust with the [VOL+] key (adjusted value up) or [VOL--] key (adjusted value down) so that the adjusted value becomes 05.
This set LCD display
66. Press the x key. (00 is blinking) 67. Adjust with the [VOL+] key (adjusted value up) or [VOL--] key (adjusted value down) so that the adjusted value becomes 1C.
This set LCD display
0 230D7205
05: Adjusted value
0 2 30D751C
1C: Adjusted value
56. Press the X key. (0D72 is blinking) 57. Press the [VOL+] key once to change the blinking portion to 0D73.
This set LCD display
68. Press the X key. (0D75 is blinking) 69. Press the [VOL+] key once to change the blinking portion to 0D76.
This set LCD display
0 2 30D7300
00: Adjusted value
0 2 30D7600
00: Adjusted value
58. Press the x key. (00 is blinking)
70. Press the x key. (00 is blinking)
28
 $4.99 MZR500 SONY
Owner's Manual Complete owner's manual in digital format. The manual will be available for download as PDF file aft…
|
|
|
> |
|