|
|
|
Categories
|
|
Information
|
|
Featured Product
|
|
|
 |
|
|
There are currently no product reviews.
 ;
Very good copy in a 54 pages PDF archive. This is my sixth purchase here. :)
;
Another excellent buy! File too clear and explanatory.
 ;
A manual hard to find. It was very helpful to restore my device.
;
I am very grateful for this manual. Without it could not repair my receiver.
;
excellent work as always you do cheap, fast net and clean. you do an incredible service......thanks!
Grounding of the inverter circuit board WARNING! DISCHARGE THE HIGH VOLATGE CAPACITORS For about 30 seconds after the oven is turned off, an electric charge remains in the high voltage capacitors in the Inverter Power Supply circuit board. When replacing or checking parts, remove the power plug from the outlet and short the inverter output terminal of the magnetron filament terminals to the chassis ground with an insulated handle screwdriver to discharge. Please be sure to touch the chassis ground side first and then short to the output terminals.
Discharging the high voltage capacitors WARNING There is high voltage present with high current capabilities in the circuits of the primary and secondary windings, choke coil and heat sinkof the inverter. It is extremely dangerous to work on or near these circuits with the oven energized. DO NOT measure the voltage in the high voltage circuit including the filament voltage of the magnetron. WARNING Never touch any circuit wiring with your hand or with an insulated tool during operation.
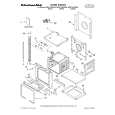
3.3 Part replacement.
When any part or component is to be replaced, always ensure that the power cord is removed from the wall outlet.
3.4 When the 20A fuse is blown due to the operation of the short switch:
WARNING When the 20A 120V fuse is blown due to the operation of the interlock monitor switch, replace all of the components (primary latch switch, short switch and power relay B (RY1)). 1. This is mandatory. Refer to �adjustments and measurements� for the location of these switches. 2. When replacing the fuse, confirm that it has the appropriate rating for these models. 3. When replacing faulty switches, be sure the mounting tabs are not bent, broken or deficient in their ability to hold the switches.
|
|
|
> |
|