There are currently no product reviews.

;
muy buen manual con multiples graficos y formas de onda ademas de muy completo y bien presentado.

;
As Always these people were very rapid and efficient. A great job helping hobbiest and workers!!! Thank you a lot!
;
Excellent printing quality.
A complete and very usefull service manual with all details.
GREAT SERVICE AT VERY LOW PRICE!
A+++++++++++++++++++++++++
;
Excellent printing quality.
A complete and very usefull service manual with all details.
GREAT SERVICE AT VERY LOW PRICE!
A+++++++++++++++++++++++++
;
Thank you for providing quickly a manual so old! very good job clear and understandable!
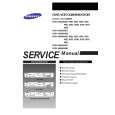
SPEAKER DISASSEMBLY INSTRUCTIONS SPEAKER (SX-NBL40) <44EZ, 44K, NDR6EZ> PARTS LIST
Type.1 Insert a flat-bladed screwdriver into the position indicated by the arrows and remove the panel. Remove the screws of each speaker unit and then remove the speaker units. Type.4
TOOLS
1 Plastic head hammer 2 ( � ) flat head screwdriver 3 Cut chisel
1 2 3 4 5 6 7 8 9 10 8A-NSX-001-010 8A-NSX-014-010 8A-NSX-015-010 8A-NSX-016-010 8A-NSX-003-010 8A-NSX-010-010 8A-NSX-011-010 8A-NSX-012-010 8A-NSX-013-010 87-NS7-611-010 REF. NO PART NO. KANRI NO. DESCRIPTION REF. NO PART NO. KANRI NO. DESCRIPTION
PANEL,FR PANEL,BA L PANEL,BA R PANEL,DUCT GRILLE,FRAME ASSY PANEL,TW R PANEL,TW L PROTECTOR, TW R PROTECTOR, TW L CORD,SPKR
11 8A-NSX-602-010 12 8A-NSK-604-010 13 87-NSH-612-010
SPKR, W 140 SPKR,TW 60 SPKR,CERAMIC ASSY
1
2
3
How to Remove the PANEL, FR
Type.2 Remove the grill frame and four pieces of rubber caps by pulling out with a flat-bladed screwdriver. Remove the screws from hole where installed rubber caps. Insert a flat-bladed screwdriver into the position indicated by the arrows and remove the panel. Remove the screws of each speaker unit and then remove the speaker units. 1. Insert the ( � ) flat head screwdriver tip into the gap between the PANEL, FR and the PANEL, SPKR. Tap the head of the ( � ) flat head screwdriver with the plastic hammer head, and create the clearance as shown in Fig-1. 2. Insert the cut chisel in the clearance, and tap the head of the cut chisel with plastic hammer as shown in Fig-2, to remove the PANEL, FR. 3. Place the speaker horizontally. Tap head of the cut chisel with plastic hammer as shown in Fig-3, and remove the PANEL, FR completely.
SPEAKER (SX-NBL42) <46EZ> PARTS LIST
REF. NO 1 2 3 4 6 7 8 9 10 11
KANRI DESCRIPTION NO. 8A-NSX-001-010 PANEL,FR 8A-NSX-014-010 PANEL,BA L 8A-NSX-015-010 PANEL,BA R 8A-NSX-016-010 PANEL,DUCT 8A-NSX-010-010 PANEL,TW R 8A-NSX-011-010 8A-NSX-012-010 8A-NSX-013-010 87-NS7-611-010 8A-NSX-602-010 PANEL,TW L PROTECTOR, TW R PROTECTOR, TW L CORD,SPKR SPKR, W 140
PART NO.
REF. NO
KANRI DESCRIPTION NO. 12 8A-NSK-604-010 SPKR,TW 60 13 87-NSH-612-010 SPKR,CERAMIC ASSY
PART NO.
SPEAKER (SX-NSZ53) <44G> PARTS LIST
Type.3 Insert a flat-bladed screwdriver into the position indicated by the arrows and remove the panel. Turn the speaker unit to counterclockwisedirection while inserting a flat-bladed screwdriver into one of the hollows around speaker unit, and then remove the speaker unit. After replacing the speaker unit, install it turning to clockwise direction until "click" sound comes out.
REF. NO 1 2 3 4 5
PART NO.
KANRI NO.
DESCRIPTION
8A-NSJ-001-010 8A-NSJ-002-010 8A-NSJ-008-010 8A-NSJ-024-010 8A-NSJ-004-010 8A-NSJ-006-010 87-NS7-611-010 88-MS1-608-010 8A-NSX-602-010 8A-NSK-604-010
PANEL,FR R PANEL,FR L PROTECTOR,TWA GRILLE,FRAME ASSY L GRILLE,FRAME BADGE,AIWA S35 CORD,SPKR SPKR, CERAMIC SPKR, W 140 SPKR,TW 60
Fig-1
Fig-2
6 7 8 9 10
Fig-3
How to Attach the PANEL, FR
Attach the PANEL, FR to the PANEL, SPKR. Tap the four corners of the PANEL, FR with the plastic hammer to fit the PANEL, FR into the PANEL, SPKR completely.
37
38