|
There are currently no product reviews.
 ;
Very clear copy. No pages missing. Big bonus is that it includes supplement. Price is affordable compared to what others ask for.
;
Found the quality of the copy excellent and a very quick service. I would certainly recommend the service.
;
Good quality, clear diagrams. Exactly what I needed.
 ;
Good product. All the information is invcluded, but due to the complexity of the amplifier, it still is difficult to get it to operation again.
;
Very professional seller; very fast, accurate and rielable service.
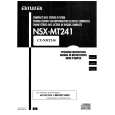
SPEAKER DISASSEMBLY INSTRUCTIONS
Type.1 Type.4
Insert a flat-bladedscrewdriverinto the positionindicatedby the arrowsand removethe panel.Removethe screwsof each speaker unit and then removethe speakerunits.
TOOLS @ Plastichead hammer @ (e) flat head screwdriver @ Cut chisel
J
Type.2
How to Remove the PANEL, FR
1.
Removethe grill frame and four piecesof rubbercaps by pulling out with a flat-bladedscrewdriver.Removethe screwsfromhole where installedrubber caps. Insert a flat-bladedscrewdriverinto the position indicated by the arrows and remove the panel. Removethe screwsof each speakerunit and thenremovethe speaker units.
Insertthe (~) flat head screwdrivertip into the gap betweenthe PANEL,FR and the PANEL,SPKR. Tap the head of the (@)flat head screwdriverwith the plastic hammerhead,andcreatethe clearanceas shownin Fig-1. Insertthe cut chiselin the clearance,and tap the headof the cut chiselwithplastichammeras shownin Fig-2,to removethe PANEL,FR. Placethe speakerhorizontally.Tap head of the cut chiselwithplastichammeras shownin Fig-3, and removethe PANEL,FR completely.
2.
3.
Type.3
Insert a flat-bladedscrewdriverinto the positionindicatedby the arrows and remove the panel. �llsmthe speaker unit to counterclockwisedirectionwhile insertinga flat-b}aded screwdriverinto oneof thehollowsaroundspeakerunit,andthenremovethespeaker unit.Afterreplacingthe speakerunit,installit turningto clockwise directionuntil �click soundcomesout.
Fig-1 Fig-2
l=ig-3
How to Attach the PANEL, FR
Attachthe PANEL,FR to the PANEL,SPKR. Tap the four comersof the PANEL,FR withthe plastichammerto tit the PANEL,FR into the PANEL,SPKRcompletely.
-52-
|