|
|
|
Categories
|
|
Information
|
|
Featured Product
|
|
|
 |
|
|
There are currently no product reviews.
 ;
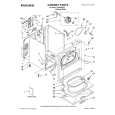
I found the manual to be clear concise and complete. It was of immense assistance when removing the unit as the unit was over 22 years old and the wiring diagram was unobtainable from the manufacturer. The exploded drawings were clear as were the instructions and labels.
;
I will highly recommend this seller. They are honest, accurate, fast and responsible.
;
This manual was very good & was very helpful with repairs.
Always great & fast service from Owner's manual.
;
Very pleased with the quality of the scan. No complaints whatsoever.
 ;
I liked the product. I would use their sevices again.
GS6EE / NV-GS6GC / NV-GS17E / NV-GS17EB / NV-GS17EF / NV-GS17EG / NV-GS17EP / NV-GS18E / NV-GS21E / NV-GS21EB / NV-GS21EG / NV-GS21EK / NV-GS21EP / NV-GS25GC / NV-GS25GN / NV8GK / NV-GS35E / NV-GS35EB / NV-GS35EG / NV-GS35EP / NV-GS35GC / NV-GS35GN / NV-GS38GK
1.3.1.
Important
The wires in this mains lead are coloured in accordance with the following code:
As the colours of the wires in the mains lead of this appliance may not correspond with the coloured markings identifying the terminals in your plug, proceed as follows: The wire which is coloured BLUE must be connected to the terminal in the plug which is marked with the letter N or coloured BLACK. The wire which is coloured BROWN must be connected to the terminal in the plug which is marked with the letter L or coloured RED. Under no circumstances should either of these wires be connected to the earth terminal of the three pin plug, marked with the letter E or the Earth Symbol.
1.3.2.
Before use
remove the Connector Cover as follows.
1.3.3.
How to replace the Fuse
1. Remove the Fuse Cover with a screwdriver.
2. Replace the fuse and attach the Fuse cover.
5
|
|
|
> |
|