|
There are currently no product reviews.
 ;
perfect and good copies, all good readable.
within 24hrs and very cheap also.
 ;
Great salespeople, muuito attentive recommend everyone buy this site.Obrigado by atendomento..
;
everything was fine - fast, readable, worth the price
;
I'm happy to get a manual from this rare old amp. The pdf is from good qualty.
;
very quick service and manual as described - would happily trade here again!
NX-HD10
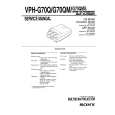
Removing the Mechanism P.C. Board (Refer to Fig 10.)
Reference:The mechanism P.C. board can be removed without removal of the TRAMECHA assembly.
C
Flexible wire
Shorting round
Note: Before disconnecting the flexible wire coming from the pickup from the connector, be sure to solder its shorting round. If the flexible wire is connected without soldering, it may cause breakdown of the pickup. 1. Solder the shorting round of the flexible wire connected with the mechanism P.C. board from the back of the mechanism assembly. 2. Disconnect the flexible wire from the connector CN601 on the mechanism P.C. board. 3. Remove the three screws C fastening the mechanism P.C. board. 4. Unsolder the two points of the part h and one point of the part i of the mechanism P.C. board. Then, remove the mechanism P.C. board upwards. Note: When reinstalling the mechanism P.C. board, connect the flexible wire coming from the pickup to the connector first and then remove the solder from the shorting round of the flexible cable.
Soldered part h
CN601 on mechanism P.C. board
C
C
Soldered part i
Fig. 10
1-17
 $4.99 NX-HD10 JVC
Owner's Manual Complete owner's manual in digital format. The manual will be available for download as PDF file aft…
|