|
|
|
Categories
|
|
Information
|
|
Featured Product
|
|
|
 |
|
|
There are currently no product reviews.
 ;
Great service. Manual is as advertised and delivered when promised.
;
Perfect quality, highly appreciated service !!!
Fast delivery of the download info, no issues at all. Recommended E-manual shop !!!
;
hi owners manual- crew,
i am very satisfied about the trade with you.
if i need some other manuals, i will contact you again.
thanks
frank kappler
;
Full Panasonic service Manual, as described, no problems
;
This place is amazing. Got our manual in a few hours. Print quality is excellent. Even the manufacturer didn't have this manual. The price was excellent. How many more stars can I give them? More than satisfied.
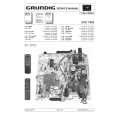
Assigning Programme Positions
r
1
2nd possibility Assigning programme positions manually Pres the i and then the OK button. The programme menu is displayed.
P+ PR 14 B UHF TUNE �n S 0 OK DEC OFF i
Dialogue line
--- n -------- n -------------- n -------- n -------------------- n -----Sort � 0�9 Use the 2 or button to select the desired menu item. select the programme position to be assigned with the P+/Pbutton. Selct the band UHF (C21-C69) or ----. If ---- is selected under �B�, the following programme positions can no longer be selected using the P+ and P- buttons.
Under �PR� �B�
"
�TUNE� Press the P+ or P� button to display the manual search menu. Press and hold down the or button to start the search. The search stops at each programme which can be received. If finetuning is necessary (programme positions 1-20), briefly press the or button until the best picture and sound quality is obtained. Press the i button to return to the programme menu. �S� �DEC� The televsion standard (norm) cannot be changed. If an encoded programme is assigned to this programme position and an appropriate descrambler (decoder) is connected, then select �ON�.
� "
3 4
Press the OK button to store the modified settings. Press the i button to return to the TV picture.
10
|
|
|
> |
|