|
|
|
Categories
|
|
Information
|
|
Featured Product
|
|
|
 |
|
|
There are currently no product reviews.
 ;
I am only search for 5 Minute, by it in 5 Minutes to and get ist in few ours! Best i found in the Internet and my Amplifer is repaired as well! Thank you
 ;
Readable text and good copy. Very much needed if you wish to do some repairs on this fine old unit.
;
Fint forløb med levering af manualen. Kvaliteten af skanningen betegnes som middel
;
I found the manual to be clear concise and complete. It was of immense assistance when removing the unit as the unit was over 22 years old and the wiring diagram was unobtainable from the manufacturer. The exploded drawings were clear as were the instructions and labels.
;
I will highly recommend this seller. They are honest, accurate, fast and responsible.
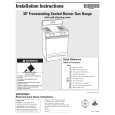
5-2. Replacing the CPU
1. Removing the CPU
1 Insert a flat-blade screwdriver into the notch as shown in the illustration rotate it so that the protrusion comes to the lock release position. 2 Pull the CPU gently upward to lift it out of the CPU socket. and
2. Installing the CPU
1 Align the triangle reference mark of the CPU with that of the CPU socket and insert all the pins of the CPU to the corresponding holes of the CPU socket. 2 While pressing the two positions marked by a, insert the flat head (-) screwdriver into the specified position and rotate the screwdriver to the LOCK position.
1
2
1 CPU Lock position 2
2 CPU Lock release position Reference marks 1
Lock release position
CPU socket
Lock position
CPU socket
NOTE: Rotate a flat-blade screwdriver to the lock position securely. If not, the operation of the CPU may become unstable.
Confidential
PCG-GRT55F/GRT5xF/GRT77V/GRT99V/GRT9xV (J) PCG-GRT360ZG/GRT380ZG/GRT390Z/GRT390ZP (AM) PCG-GRT915M/GRT916V/GRT916Z/GRT995MP/GRT996VP/GRT996ZP (EU) PCG-GRT50ZCP (AO)
5-2 (END)
|
|
|
> |
|