|
|
|
Categories
|
|
Information
|
|
Featured Product
|
|
|
 |
|
|
There are currently no product reviews.
 ;
I am so happy found this site as it consists of so many Manuls and easy to aquire. This onei s exactly what I wanted and much more as it has info on not only how to use the tuner but how to repair it as well. I will come here 1st before purchasing else where! Thanks owner-manual.com!
;
Top class product, I printed it out on A3 paper and it is clear and very easy to follow.
Cheaper than buying a new radio!
;
is part of the manual is very useful for repairing
Here are circuit diagrams
if there is damage, I recommend using this part of the
a complete list of circuit boards and components
 ;
Hello.
This paper enable me, to bring this lovley Scope into Function.
Without this Page, i have no cance to make this finish.
Hans M. Knoll Germany
;
I used for first time this the wheat and am very thanked
5
6
7
8
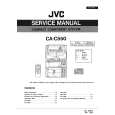
6.3 METHOD FOR REPLACING THE SERVICE PANEL ASSY
A
When the Panel Assy is replaced with one for service, the following adjustments are required:
Adjustments of Vofs voltage and Vyprst voltage
Enter the reference adjustment values for the Vofs voltage and Vyprst voltage that are written on the label attached to the panel for service. Note: Enter the values, using an RS-232C command or the Factory Menu.
AWU���� Vofs = 35V Vyprst = 270V Hour Meter Space H (Rear of the Panel) AWU���� Vofs = 35V Vyprst = 270V Hour Meter 1520 H Write in the value for the hour meter when the Panel is replaced (ex. 1520H).
B
Using an RS-232C command Enter a "PFY" command with Factory mode ON. Convert the adjustment voltage values written on the label attached at the rear of the Panel to an input command, referring to the conversion chart. (See the next page.) � Reference adjustment of the Vofs voltage: Ex. "Vofs = 35" � (Check the conversion chart.) Enter "VOF112." � Reference adjustment of the Vyprst voltage: Ex. 50-inch "Vyprst = 270 V" � (Check the conversion chart.) Enter "VRP055." (Note that the conversion charts for 50-inch and 43-inch Panels are different.) Using the Factory Menu
1 1 5 10 15 20 25 30 32 1 1 5 10 15 20 25 30 32
P AN E L
FAC T .
VD 1 � 1 1 6 01 � NT V � J HS 6 [ TBL 1 / 6 0 VS ]
P AN E L
FAC T . ADJ
VD 1 � 1 1 6 01 � NT V � J HS 6 [ TBL 1 / 6 0 VS ]
P AN E L � 1
5
C
5
10
10
15 16
P AN E L � 1
ADJ
(+)
15 16
VOL
RST
P
<=>
: 058
Select the main item "PANEL FACT." by pressing the MUTE key then enter Panel Factory mode by pressing the SET key. Using the 5/� keys, select "PANEL-1 ADJ" then press the SET key to enter the next lower nested layer. Select "VOL-OFFSET" or "VOL RST P" then enter a command value converted from the voltage value, using the 2/3 keys.
D
Clearing data on various histories of the Panel, such as those on the hour meter
� It is necessary to clear the data on the hour meter, etc. to match them to the actual driving hours of the Panel. � It is also necessary to clear the data on SD and PD, because the accumulated power-on time when a shutdown or powerdown occurred is recorded. Note: Clear the values, using an RS-232C command or the Factory Menu. There are two types of hour meters. Do not take the MR hour meter for the hour meter. Using an RS-232C command To acquire the accumulated power-on time of the product itself, use the "GS2" RS-232C command. 1 To clear the data on the hour meter (for the Panel) : CHM 2 To clear the data on the pulse meter : CPM 3 To clear the data on the SD history : CSD 4 To clear the data on the PD history : CPD
E
Using the Factory Menu See "7.1.7 HOW TO CLEAR HISTORY DATA."
F
PDP-436PE
5 6 7 8
57
|
|
|
> |
|