|
|
|
Categories
|
|
Information
|
|
Featured Product
|
|
|
 |
|
|
There are currently no product reviews.
 ;
The Service Manual received was helpful. The electronic information is exactly what I needed.
;
The Manual was perfect.
The deliverie was perfect.
Thanks
;
Found website easy to use and manual very clear. First class service
 ;
The quality is quite good and clear. Nothing of the informations inside is lost during the digitalizing process
;
Very good service, fast downloads and good manuals.
PG-C30XE
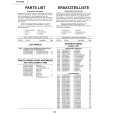
ADJUSTING THE PC BOARD (CPCi-0047CE02. PC I/F Unit)
1. Setting the oscilloscope Set the range to DC 1 V/div and 5µs/div. 2. Connecting the PC interface 1) Connect the PC interface to the projector. Make surethe CON2 (P8404), CON3 (P8502) and CON4 (P8405)connectors are all tight in position. 2) Connect the cable between the computer�s ANALOG OUTPUTterminal and the DSUB (INPUT1 on the projector)connector. 3) Set the projector�s input selector to the RGB1position. 4) Set the signal generator to the XGA mode (1024 x 768, 60Hz, 32-tone scale). Keep the output amplitude at 700mVp-p. 5) Turn on the power. 3. Adjusting the levels and checking the tones 1) Press the SW5101 switch to call up the process mode. 2) Enter 8 for the SH-PHASE setting on the OUTPUT3 menu. (Adjust to get the on-screen display characters clearand crisp.) (A/D menu adjustment) 3) R-BRIGHT adjustment: Feed the black signal and adjust the R-BRIGHT setting on the A/D menu screen until the bitless state. 4) G-BRIGHT adjustment: Feed the black signal and adjust the G-BRIGHT setting on the A/D menu screen until the bitless state. 5) B-BRIGHT adjustment: Feed the black signal and adjust the B-BRIGHT setting on the A/D menu screen until the bitless state. 6) R-D adjustment: Feed the white signal and adjust the R-D setting on the A/D menu screen until the bitless state. 7) G-D adjustment: Feed the white signal and adjust the G-D setting on the A/D menu screen until the bitless state. 8) B-D adjustment: Feed the white signal and adjust the B-D setting on the A/D menu screen until the bitless state. 4. DTV adjustment 1) Feed the 480P Y signal to INPUT1. Keep the R (Pr) and B (Pb) without signal input. 2) G-BRIGHT adjustment: Make this setting the same as the G-BRIGHT setting on the A/D menu screen. 3) CR-OFFSET adjustment: Feed the 56% white signal and adjust the CR-OFFSET setting on the DTV menu screen until the bitless state. 4) CB-OFFSET adjustment: Feed the 56% white signal and adjust the CB-OFFSET setting on the DTV menu screen until the bitless state. 5) G-BRIGHT correct adjustment = Adjust the value of G-BRIGHT up 6 point. 6) Press SW5101 and exit from the process mode.
Servicing precautions
If the convergence gets out of spec in servicing the set, call the process mode and select the following group and subjects. Group: NOKO Subject: R-CNV-H, R-CNV-V G-CNV-H, G-CNV-V B-CNV-H, B-CNV-V (H and V are for horizontal and vertical adjustments, respectively.) Adjust the above settings to the range of 0 to 4.
28
|
|
|
> |
|