|
|
|
Categories
|
|
Information
|
|
Featured Product
|
|
|
 |
|
|
There are currently no product reviews.
 ;
It was just what I need to fix my old BMW's CD player. Very convenient also. Thank you.
;
Great Manual! It contains all the wiring schematics and mechanical exploded views that are essential for service and repair. I was surprised I even found this for such an old machine. Only wish I knew of this site many years ago.
;
Great manual very clear copied. You are making an incredible job. I appreciate a lot the rapidity and your efficiency. Thanks a lot
;
Good pdf of the service manual for this unit. Includes disassembly instructions, full schematics, board layouts, parts lists and diagnostic information. Some information is in the pdf twice (single pages, and split pages), but that could be how it was originally generated by panasonic, or perhaps the idea is to make it eaiser to put onto 8.5 x 11" pages.
Information was exactly what I needed. Delivery was overnight (less than 12 hours) and I was happy with the process.
;
5 STARS for FAST DELIVERY, BEST PRICES and QUALITY PRODUCT. Item was exactly as described with superb resolution. Will definitely source all my future requirements from this website. Thanks a lot owner-manual.com!
PG-M15X PG-M15S
AN-M15T
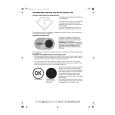
� Precautions in disassembling the optical mechanism
Note: If the optical mechanism needs repairs, preferably replace the entire optical mechanism assembly with new one. This is because to very fine adjustments are needed for some parts.
Reflection mirror Place back just in the same position and direction. Otherwise shades may appear on the projector screen. Each positioning is needed. Projection lens This lens cannot be disassembled. Condenser lens 1 and 2 Place back just in the same position and direction. Otherwise shades may appear on the projector screen. Each positioning is needed.
Rod lens Place back just in the same position and direction. Otherwise shades may appear on the projector screen. Each positioning is needed.
Color wheel Once disassembled, this part may need readjustment.
DMD assembly This assembly can be disassembled. But be careful not to allow dust and fingerprint on it. Otherwise the images may be adversely affected.
If the rod lens or mirror has not been correctly adjusted, there will be shades on the projection screen.
� Initial factory settings
These models require no additional electrical adjustment. If by any chance the factory settings must be made again, however, call the process adjustment mode first in the following procedure. 1. Calling the process adjustment mode 1) Turn on the power. Press the ON/OFF button on the projector or the POWER button on the remote controller. 2) Make sure the message �Turn Power OFF?� on the screen. With this message still onscreen, press the buttons in this order: �'�, �'�, �"� and �"� on the remote controller, or �+�, �+�, �-� and �-� on the projector. 3) Be sure the process adjustment menu appears on the screen. 2. Using the �'� and �"� buttons on the remote controller or the �+� and �-� buttons on the projector, select �SSS� and press the �ENTER� key. 3. Using the �'� and �"� buttons on the remote controller or the �+� and �-� buttons on the projector, select the following setting according to the destination and press the �ENTER� key. Setting "S4" "S6" Destination Europe, Asia, Oceania North America
29
 $4.99 PGM15S SHARP
Owner's Manual Complete owner's manual in digital format. The manual will be available for download as PDF file aft…  $4.99 PG-M15S SHARP
Parts Catalog Parts Catalog only. It's available in PDF format. Useful, if Your equipment is broken and You need t…
|
|
|
> |
|