|
|
|
Categories
|
|
Information
|
|
Featured Product
|
|
|
 |
|
|
There are currently no product reviews.
 ;
Finding the owners manual for my Pioneer CRWM62R is greatly appreciated. I had searched several other web sites with no success. Although my manual was not listed on your site for immediate download, I recevied an email within a few hours that my ower's manual was posted for me. I had no difficulty downloading the manual for my 20 year old multi-cassette player. Owner Manuals provides a service that is valuable, easy-to-use, accurate , efficient, and priced fairly. I thank you.
;
Excellent manual - just what I needed. Although currently available only in German, their are lots of pictures which makes it all very clear.
;
PHILIPS PE1642 Owner's Manual
Hi,
you have complet fullfilled my expectance.
Price is OK.
Robert Schmid
 ;
Came in the mail within a few hours. Gave clear instruktion on maintaines. Is of great use to have this manual in house
;
Easy to access. Clear instructions. No problems. Printed fine.
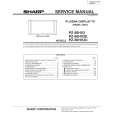
Control Functions and Connections --- (1)
� � �
4 - 8Ω
12-24Ω
4 - 8Ω
12-24Ω
30-50Ω
30-50Ω
D V
Left
PHA-200
Right
����� ����
�
�
���
�
�� ��
�� ��
�����
�� �����
����
���
���
���������� ����� ���� ��������� �������
���� �� �����
�
�
�
���� ����
(1) Input resistance selector for left channel
Select the position suited to the cartridge DC resistance. Before changing the selector, you should ensure that the volume control of the pre-amplifier is turned to a minimum or the AC power for the audio system is turned off.
prevent any "HUM" from interfering with the music signal.
(6) Input RCA plug for left channel
This input should be connected to the tonearm output RCA plug for left channel.
(2) Power Indicator
The DV logo lights up when the PHA-200 is on and eceiving AC power.
(7) Output RCA plug for right channel
This output should be connected to the "MM 47K ohms" phono input of the pre-amplifier or the input of a "MM" phono stage for right channel. You should not connect them to the "MC" phono input.
(3) Input resistance selector for right channel
Select the position suited to the cartridge DC resistance. Before changing the selector, you should ensure that the volume control of the pre-amplifier is turned to a minimum or the AC power for the audio system is turned off.
(8) AC power cable
This cable should be connected to the AC power socket (11) of the power supply unit.
(4) Input RCA plug for right channel
This input should be connected to the tonearm output RCA plug for right channel.
(9) Output RCA plug for left channel
This output should be connected to the "MM 47K ohms" phono input of the pre-amplifier or the input of a "MM" phono stage for left channel. You should not connect them to the "MC" phono input.
(5) Ground post
Ground wires for either the tonearm and/or the turntable should be connected to the ground post of the PHA-200 to 2
|
|
|
> |
|