|
There are currently no product reviews.
 ;
Manual was delivered in a timely manner and was all in English as advertised. The manuals I received when we moved into our flat were in German, Italian, and French. Having never used a steamer before, and not speaking/reading German very well, I needed an English Manual. this was a huge help.
 ;
Great Manual. This manual is available no where else. It was exactly what I was looking for. Only in German.
;
This GRUNDIG UV5A Owner Manual is not only an instruction manual but a total functional circuit description of the Multimeter and includes circuit diagram at the end pages. It is very helpful for repairing and calibrating the instrument. It is written in two languages English and German for international support. It was very easy to repair my unit with this document. Regards, Regis Pauly, Electrical Engineer.
;
The owner's manual was evetything I thought it would be. I was able to print it out using both sides of the paper in quick order, saving me a search online for a used one.
;
Хорошее качество сканирования.
Мануал пришел часов эдак через 12. В целом доволен.
Troubleshooting
4
Cleaning for ink smears: paper-exit path
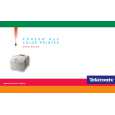
If you have already performed the other �Cleaning for ink smears� procedures described earlier in this chapter but problems persist, you should manually clean the paper-exit path. Refer also to �Cleaning for ink smears and jams: paper-feed rollers� on page 64. Occasionally, stray ink particles and oil become attached to the exit �ngers, rollers, and guides under the exit cover causing ink streaks or marks on the top edge, front, or back of prints. When this occurs, you must clean these parts using both dry swabs and alcohol-soaked wipes. Sample ink smear: paper-exit path
9103-13
1. 2.
Open the exit cover. Clean excess ink particles and oil from the blue exit �ngers by gently wiping the top surface of each �nger using a dry swab.
Iso 90% p alco ropyl ho l
9103-14
CAUTION
To avoid damaging the print drum and exit �ngers, never scrape excess ink with a tool or �ngernail; use a dry swab provided with the cleaning kit.
Advanced Features and Troubleshooting Manual
67
|