|
|
|
Categories
|
|
Information
|
|
Featured Product
|
|
|
 |
|
|
There are currently no product reviews.
 ;
Very good quality, prompt response. This website has reasonable prices and wide range of manuals that are hard to find.
;
The document was usefull, and it was exactly what I was looking for.
;
OK?..manual is complet and helpfull... for repairing such a old and rare boombox like JVC PCM it is necessary...
;
Super Anleitung. Ordentliche Auflösung. Das ganze noch in Deutsch wäre zu schön. Alle Datenblätter sind sauber Kopiert und alle Leitungswege sind sauber ausgeführt
;
Thanks God for the internet and thanks for the service like this - proffessional solution on time.
CD SECTION
Notes on Adjustment 1. Perform adjustment in test mode. After adjustments, be sure to release test mode. 2. Perform adjustments in the order given. 3. Use the disc (YEDS-18. Part No. 3-702-101-01) only when so indicated. How to Put the Set into Test Mode 1. 2. 3. 4. Disconnect an AC plug cord. (Power is not applied to the set.) Solder across the TEST1 terminal. Close the lid (CD). Connect an AC plug cord.
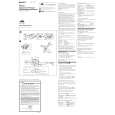
E-F Balance Adjustment This adjustment is to be done when the optical pick-up is replaced. Procedure:
oscilloscope (DC range) CD board TP (TRACKING-Y) TP (VC)
+ �
[SW1 BOARD] (Conductor Side)
TEST1 terminal
1. Connect the oscilloscope to TP (TRACKING-Y) and TP (VC) on the CD board. 2. Insert the disc (YEDS-18) in and close the lid (CD). 3. Put the set into test mode. 4. Press the + and = buttons to move the optical pick-up to the center. 5. Press the ( button. From focus searching, focus is turned ON while entering CLV drawing-in mode. Tracking and sled are turned OFF. 6. Adjust RV703 so that the oscilloscope traverse waveform is symmetrical, as shown in the figure below.
Note: Take long sweep time for easy monitoring. VOLT/DIV: 0.2 V (with the 10:1 probe in use.) TIME/DIV: 1 ms A A A=B B A=B 0V B
How to Release the Test Mode 1. Be sure to disconnect the AC plug cord and remove the solder bridge at the TEST1 terminal connected before in setting. 2. The set thus becomes available for normal operation Before Beginning Adjustment Put the set into test mode and perform the following checks. Repair if there are any problems. � Sled Motor Check Press the +, = buttons and confirm that the optical pick-up moves smoothly from the innermost to outermost circumference and back smoothly and with no catching or abnormal noises. + : Optical pick-up moves to the outer circumference = : Optical pick-up moves to the inner circumference � Focus Search Check 1. Press the ( button. (Focus search operation is performed continuously.) 2. Look at the optical pick-up objective lens and confirm that it moves up and down smoothly, when no catching or abnormal noises. 3. Press the p button. Confirm that focus search operation stops. If it does not , press the p button again longer.
Note: When the malfunction is occurred by mis-passing other keys, turn off the power and check again from making the test mode.
0V
Adjustment value: 0.4 ± 0.2 Vp-p (A + B) 7. Release the test mode after adjustment is completed. Adjustment Location: CD board (See page 19.)
� 16 �
|
|
|
> |
|