|
There are currently no product reviews.
 ;
Great quality complete service manual! complete parts list and drawings. Thanks!
;
Very good quality, prompt response. This website has reasonable prices and wide range of manuals that are hard to find.
;
The document was usefull, and it was exactly what I was looking for.
;
OK?..manual is complet and helpfull... for repairing such a old and rare boombox like JVC PCM it is necessary...
;
Super Anleitung. Ordentliche Auflösung. Das ganze noch in Deutsch wäre zu schön. Alle Datenblätter sind sauber Kopiert und alle Leitungswege sind sauber ausgeführt
5
6
7
8
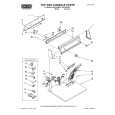
INSTALLATION
A
1. Remove the PRV-LX1 top panel. � Remove the seven screws in the top panel and the top panel (these screws will be used to reinstall the top panel in Step 14).
Top panel
B
2. Remove the rear panel blind plate. � To prevent the blind plate from dropping, hold it in place while removing the two black installation screws (these screws will be used to reinstall the terminal cover in Step 12). Blind plate Remove the blind plate on the left (as seen from the rear) to install the PRA-BD11 input board. Note: Make sure that the removed screws are not mixed up with the screws supplied with this unit.
C
Remove the blind plate on the right (as seen from the rear) to install the PRA-BD12 output board.
3. Remove the rear bridge. � Remove the four installation screws and the rear bridge (these screws will be used to reinstall the bridge in Step 9). Rear bridge Note: Make sure that the removed screws are not mixed up with the screws supplied with this unit.
D
E
F
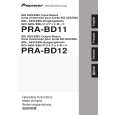
PRA-BD11
5 6 7 8
61
|