|
|
|
Categories
|
|
Information
|
|
Featured Product
|
|
|
 |
|
|
There are currently no product reviews.
 ;
helpful manual.good service.Quick response.will use again
 ;
Speedy confirmation to my order , with elaborate instructions .
Item Email , received immediately as desired by me.
A Pleasant & Satisfying Transaction.
;
I was searching for this manual at last i got it from this web
;
What can i say but i would have been lost without your support.
Thank You!
;
Très satisfait ! envoi rapide, Grand catalogue disponible. Many thanks !
Installation
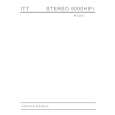
12. Befestigen Sie die Platte von DiscFach 2 am Disc-Fach von Laufwerk 2. 1 Betätigen Sie die DRIVE SELECT-Taste zur Wahl von "DVD2". ÷ Betätigen Sie die DRIVE SELECT-Taste so oft, bis die DVD2-Anzeige aufleuchtet. 2 Drücken Sie die EJECT-Taste von Laufwerk 2. Das Disc-Fach von Laufwerk 2 wird ausgefahren. 3 Passen Sie die Rippen an der mitgelieferten Platte von Disc-Fach 2 in die Nuten an der Vorderkante des in Schritt 2 ausgefahrenen Disc-Fachs ein. Drücken Sie die Platte dann ein, bis die beiden Haken wie in der Abbildung gezeigt fest eingreifen.
HINWEIS: Achten Sie beim Einbau der Platte von DiscFach 2 darauf, das Disc-Fach nicht in Richtung des Schlie�ens zu drücken, da der automatische Disc-Lademechanismus das Disc-Fach anderenfalls nach innen zieht. Falls Sie versehentlich gegen das Disc-Fach gedrückt haben und dieses daraufhin eingezogen wird, warten Sie sein vollständiges Schlie�en ab, ohne das Disc-Fach zu berühren, und drücken Sie dann die EJECT-Taste von Laufwerk 2 erneut, um das Disc-Fach wieder auszufahren. Während dieses Vorgangs darf AUF KEINEN FALL die Stromzufuhr ausgeschaltet oder versucht werden, das Disc-Fach von Hand herauszuziehen, da dies eine Beschädigung des Hauptgerätes (PRV-LX1) und dieses Gerätes (PRA-DW11) sowie ein Löschen interner Daten verursachen kann.
13. Abschluss der Installation 1 Drücken Sie die STANDBY/ON-Taste an der Frontplatte des Hauptgerätes, und warten Sie, bis das Gerät in den Bereitschaftsmodus umschaltet. 2 Sobald sich das Hauptgerät im Bereitschaftszustand befindet, schalten Sie den Hauptschalter des Gerätes (an der Rückwand) aus, und trennen Sie dann das Netzkabel von der Netzsteckdose.
HINWEIS: Lassen Sie das Gerät nicht im eingeschalteten Zustand, wenn die Platte von Disc-Fach 2 nicht installiert ist (siehe Schritt 12 der Installationsanweisungen). Wenn die Platte von Disc-Fach 2 nicht installiert ist, kann Staub leichter in das Geräteinnere eindringen, was zu Funktionsstörungen bei Aufzeichnung und Wiedergabe führen kann.
EJECT-Taste von Laufwerk 2
DVD2-Anzeige DRIVE SELECT-Taste Haken
4 Nach beendeter Montage der Platte von Disc-Fach 2 drücken Sie die EJECT-Taste von Laufwerk 2, um das Disc-Fach von Laufwerk 2 zu schlie�en. Rippen Platte von Disc-Fach 2
Schlitz
Disc-Fach Schlitz
33
PRA-DW11 Ge
Deutsch
|
|
|
> |
|