|
|
|
Categories
|
|
Information
|
|
Featured Product
|
|
|
 |
|
|
There are currently no product reviews.
 ;
Great manual, thank you, sony kp46s3 service manual perfectly, i am very happy.
;
Complete original Service Manual in good (scan) quality!
;
Very good manual. Plenty of service information including alignment instructions. Clear circuit diagram. Excellent, thank you.
 ;
Good morning, the service manual you sent me was perfect.
Your service and answering are excellent.
I recomend this service.
Best regards.
;
I had been looking everywhere for a proper service manual for this VCR. Everywhere else that has this available for download has a very light version. This is the full service manual with all aspects that would interest anyone looking for the service manual for the AIWA HV-MX100 Worldwide VHS VCR. Great quality (as always). A winner hands down. Best Quality.
1
2
3
4
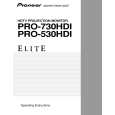
� Pattern for each adjustment item
A
Key No. ` STATIC
Key No. 1 SKEW
Key No. 5 SUB PIN
Key No. 7 LIN
RH BH
Key No. 8 SIZE = Fixed position
B
Key No. ` STATIC
Key No. 1 SKEW
Key No. 4 KEY
Key No. 6 PIN
RV BV
Key No. 7
C
Key No. 8 SIZE
LIN
Note 1: When the red CRT is replaced, or when the deflection yoke for the red is replaced, prior to adjustment, tune the center of the image to the center of the screen by turning the centering magnet. Note 2: When the DEFLECTION SERVICE Assy or DIGITAL CONV. Assy is replaced, make coarse adjustment as shown in 3.5 above.
3.6 Fine-adjustment of the Red
To fine-adjust the red, press the SET/ENTER key to enter MANUAL CONVERGENCE mode. Repeat the coarse adjustment described in "3.5 Coarse Adjustment of the Red" if necessary. Make adjustment for each SCREEN mode, and eliminate distortion to converge with the green.
D
3.6.1
Press the SET/ENTER key to enter MANUAL CONVERGENCE mode, and make adjustment in the same manner as with the green. First, adjust the vertical and horizontal the red lines at the center of the screen so that they converge with the green center lines.
3.6.3
Adjust the red horizontal lines so that they converge with the green horizontal lines. Proceed to adjustment of the upper half of the screen, then the lower half. Adjustment should be done from the part where convergence is greatly dislocated.
E
3.6.2
Adjust the red vertical lines so that they converge with the green vertical lines. Proceed to adjustment of the right half of the screen, then the left half. Adjustment should be done from the part where convergence is greatly dislocated.
F
3.6.4
Repeat the adjustments described in 3.6.2 and 3.6.3 so that all the red vertical and horizontal lines converge with the green lines. (Completion of one screen mode)
108
1 2
PRO-730HDI
3 4
|
|
|
> |
|