|
There are currently no product reviews.
 ;
Readable text and good copy. Very much needed if you wish to do some repairs on this fine old unit.
;
Fint forløb med levering af manualen. Kvaliteten af skanningen betegnes som middel
 ;
I found the manual to be clear concise and complete. It was of immense assistance when removing the unit as the unit was over 22 years old and the wiring diagram was unobtainable from the manufacturer. The exploded drawings were clear as were the instructions and labels.
;
I will highly recommend this seller. They are honest, accurate, fast and responsible.
;
This manual was very good & was very helpful with repairs.
Always great & fast service from Owner's manual.
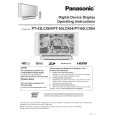
REMOVAL OF THE PROJECTION UNIT FROM THE CABINET
1. Remove the Ballast C.B.A. and the TV/Tuner Unit. Refer to Steps 1~6 in "REMOVAL OF THE BALLAST C.B.A. AND THE TV/ TUNER UNIT FROM THE CABINET." 2. 1) Disconnect Connector P2502. Then, hook the P2502 cable to the pin. 2) Remove the 7 Screws (401) on the Projection Unit. 3) Lift up and slide the Projection Unit by releasing the 5 Guide Tabs. Tips on removal of the Projection Unit: First, slide the Projection Unit to the rear (approx. 1.5 inch (4 cm)). Then, lift up the front and the rear portions of the Projection Unit by both hand to release the Guide Tabs. Then, slide out the Projection Unit. Or, remove the Fan 3 Unit from the Projection Unit at first. Refer to Fig. D2-3.
CAUTION: Disconnect Connector P2502 and hook it as follows. Pin P2502 Cable
Cover Switch C.B.A. Boss
Tips on removal of the Projection Unit
Slide
4 1 3 2
P2502
Up
<Side View>
Up
1 Lift up and slide the Projection Unit 2
Up
3
401
Fig. D2-1
Up
by approx. 1.5 inch (4 cm). 2 Lift up the front portion. 3 Lift up the rear portion. 4 Slide out the Projection Unit.
|