|
|
|
Categories
|
|
Information
|
|
Featured Product
|
|
|
 |
|
|
There are currently no product reviews.
 ;
This is exactly what I needed This was a hard one to find and I had already downloaded several for other Panasonic radios but none matched my radio.
Although my radio is the LBE model the LBS is the same.
A very good quality manual with every thing you should get in it
;
el manual es correcto , completo y de buena calidad aunque algun esquema esta excesivamente diseccionado.
;
muy buen manual con multiples graficos y formas de onda ademas de muy completo y bien presentado.
 ;
As Always these people were very rapid and efficient. A great job helping hobbiest and workers!!! Thank you a lot!
;
Excellent printing quality.
A complete and very usefull service manual with all details.
GREAT SERVICE AT VERY LOW PRICE!
A+++++++++++++++++++++++++
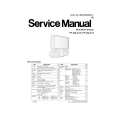
Reassembly Notes for Mirror: Install the Mirror as following procedures. 1) Peel the Protection Sheet approx. 20 mm (maximum 22 mm) from the top and bottom edges of the Mirror to place the Sheet. Then, place the 4 sheets on the top and bottom edges of the Mirror as shown.
Top edge of Mirror Sheet
Sheet
Sheet
Protection sheet
Mirror
Mirror support bracket
Sheet
Sheet
Sheet
Bottom edge of Mirror
Mirror
<Front View> Fig. D5-3-1
Fig. D5-3-2 Top Mirror Plates 2) When handling the Mirror, do not touch the Mirror surface. Be sure to hold the sheet portions of the Mirror. 3)
CAUTION: Insert the Mirror from the top into the lower slots (For model with 40 inch Mirror) or into the upper slots (For model with 45 inch Mirror) of the Back Panel carefully avoiding the Mirror Support Brackets. Otherwise, the Mirror may crack. Then, the Mirror is secured with the Mirror Support Brackets.
Screws "b"
Back Panel
Mirror (Protection Sheet)
Upper Slots (for model with 45 inch Mirror) Lower Slots (for model with 40 inch Mirror)
4) Install the 2 Top Mirror Plates on the Mirror and tighten the 4 Screws. 5) Peel the Protection Sheet from the Mirror.
<Side View> Slots
Fig. D5-4
|
|
|
> |
|