|
|
|
Categories
|
|
Information
|
|
Featured Product
|
|
|
 |
|
|
There are currently no product reviews.
 ;
I'm very satisfied with your manual service. Your website made it easy to locate the correct manual. Also the quality is great and I never had a problem reading the fine details.
Thanks again.
Jeff Miller
JM Electronics
 ;
Good quality service manual German user manual. German user manual This is a quality scan of a manual in excellent condition and is just as good as having the original manual in hand
;
The manual for Sony LBT-D505 component stereo system is was excellent , with schematics, parts layout and parts list as well as instructions for adjustments for each component. Print was clear even when enlarged.
;
It's exactly a complete and very useful manual with all details what I needed. Thank you!I will come back whenever I need your manuals or schematics.
;
I searched EVERYWHERE looking for the manual/s on this "extinct" amp. Owner-Manuals.com made it available and for nearly nothing. Thanx to them, I can decipher the unknown cables and sort them out. Thanx, Owner-Manuals.com!!
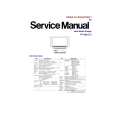
b. Focus Adjustment
1) Confirm that each of the pixels in the nine portions is clearly visible.
c. Electrical Picture Position Adjustment
1) Adjust OPT HPOSI so that �C� is symmetrical to �D.� by pressing the VOLUME UP/DOWN key on the remote to change the value. 2) Press the CH UP/DOWN key on the remote to return to the OTHER menu. 3) Select OPT VPOSI by pressing CH UP/DOWN key on the remote. 4) Adjust OPT VPOSI so that �A� is symmetrical to �B� by pressing the VOLUME UP/DOWN key on the remote to change the value.
"E" "I" "A" "F" "J"
OPT OPT HPOSI VPOSI 16 FE
OPT OPT
HPOSI VPOSI
16 FE
<Focus Screen>
2) If not, loosen the Knob on the Projection Lens until the Knob can be moved.
"C"
"D"
Knob Tighten Loosen
"K" "G" "B" <Focus Screen> "H" "L"
Up
"C"
"D" width "c" = width "d" width "c" "A" width "d"
Down
width "a" width "a" = width "b" width "b" "B"
<Front View>
Fig. 4-7 3) Adjust the Knob by moving up or down so that each of the pixels in the nine portions is clearly visible to obtain the best focus. 4) Tighten the Knob. Note: Focus Adjustment is not normally necessary. Perform this adjustment only if necessary.
5) Confirm that all �A�, �B�, �C�, �D�, �E�, �F�, �G�, �H�, �I�, �J�, �K�, �L� are each almost symmetrical. 6) If not, adjust the �OPT HPOSI� and �OPT VPOSI� (repeat steps 1-6) until the picture is in the correct position. 7) Press the CH UP/DOWN key on the remote to return to the OTHER menu.
|
|
|
> |
|