|
|
|
Categories
|
|
Information
|
|
Featured Product
|
|
|
 |
|
|
There are currently no product reviews.
 ;
I was at first dubious about payiong for downloaded manuals but having done so, I was extremely impressed with quality of the two manual I ordered, well worth the small price I paid.
I would highly recommend these to my friends.
;
reasonable price for the schematic - the service is perfect, all as expected and pointed by instructions - good scan of the original plans - thank you!
;
Manual was just as described!!! I odered it and in less than a day was able to download it and the text was clear and pages were all complete just as the original manual was. Purcashed this for a friend and they were more than happy. Perfect all around!
 ;
Excellent service and prompt delivery. But it's not a manual - only 4 pages wiring diagrams.
Thanks.
;
The manual I purchased was exactly what I needed to repair my Toshica television. The manual contained schematics and troubleshooting information that was very helpful.
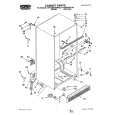
Replacing the lamp unit
Install Procedure Remove Procedure
1 Install a new lamp slowly. 3 Insert Tabs into the main unit as shown. 1 Remove speaker grille. 3 Loosen two screws securing the lamp unit. Check
that the lamp unit and its region are completely cool. The two screws are located on the right top and left bottom.
Lamp unit
Warning: Tabs Because temperature of the lamp unit is elevated immediately after its use, a direct touch to it may cause burns.
�
Speaker grille
After fully inserting lamp unit panel, tighten the screw located on the left bottom. 2 After fully inserting lamp unit, tighten the two screws located on the right top and left bottom.
2 Remove lamp unit cover, loosening the screw Do not touch these screws.
fixing it. The screw is located on the left bottom.
Do not touch these screws.
4 Pull out the lamp unit slowly. Lamp unit cover
Lamp unit cover 4 Firmly install the speaker grille.
Lamp unit
Tabs
Speaker grille
|
|
|
> |
|