|
|
|
Categories
|
|
Information
|
|
Featured Product
|
|
|
 |
|
|
There are currently no product reviews.
 ;
Great manual very clear copied. You are making an incredible job. I appreciate a lot the rapidity and your efficiency. Thanks a lot
;
Good pdf of the service manual for this unit. Includes disassembly instructions, full schematics, board layouts, parts lists and diagnostic information. Some information is in the pdf twice (single pages, and split pages), but that could be how it was originally generated by panasonic, or perhaps the idea is to make it eaiser to put onto 8.5 x 11" pages.
Information was exactly what I needed. Delivery was overnight (less than 12 hours) and I was happy with the process.
;
5 STARS for FAST DELIVERY, BEST PRICES and QUALITY PRODUCT. Item was exactly as described with superb resolution. Will definitely source all my future requirements from this website. Thanks a lot owner-manual.com!
;
OEM manual provided all schematics, board layouts and component specs necessary to facilitate unit maintenance. All pages were clear and readable.
;
Good condition and quality. Hard to find anywhere in Internet, only on this site.
PT-44LCX65 / PT-52LCX65 / PT-61LCX65
CLEANING METHOD
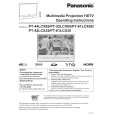
THE SCREEN UNIT AND THE MIRROR - THE SCREEN UNIT (Lenticular Screen, Fresnel Lens) It is strongly recommended that the Lenticular Screen surface (outside) and the Fresnel Lens surface (inside) should be wiped gently with a clean, soft, dry cloth to remove the dirt. Note: 1. If the dirt cannot be removed by wiping with a clean, soft, dry cloth, use a clean, soft, dry cloth moistened with diluted neutral pH liquid cleanser or a lens cleaner (usually containing a small amount of ethyl alcohol) and wipe lightly. Take care not to leave any streaks. Do not use cleaning materials containing methyl alcohol, acetone, or dichloromethane. 2. Use an air blower to clean the inner surface of the Lenticular Screen and the outer surface of the Fresnel Lens (the surfaces that one another). These surfaces must not be wiped with a cloth. - THE MIRROR Remove any dirt with an air blower or wipe with a clean, soft, dry cloth. If wiped too forcefully, the surface of the Mirror can be damaged. If wiping with a clean, dry cloth does not remove the dirt, the Mirror must be replaced.
Mirror
THE FILTER ON THE PROJECTION UNIT CAUTION: Operating with torn or damaged Air Filter may cause damage to the Projection unit. Remove the Projection Unit from rear. Then, clean the filters on the Projection Unit. Gently remove any accumulated dust from filter with a vacuum cleaner.
Air Filter Air Filter
Air Filter
Screen Unit
<Bottom View>
Fresnel Lens surface (inside)
Fig. 6-3 THE PROJECTION LENS Use lens cleaning paper and cleaner available at your local camera shop, etc. Dampen the cleaning paper with cleaner and gently wipe the surface of the lens from the center outward to remove dust. Lens
Lenticular Screen surface (outside)
Fig. 6-4 Fig. 6-1 THE LAMP Gently wipe the surface of the glass of the Lamp with cleaning paper or soft cloth.
Surface of glass
THE POLARIZER UNIT, THE FIELD LENS, THE RELAY LENS, THE CONDENSER LENS, THE DICHROIC MIRROR, THE FULL MIRRORS, THE INTEGRATOR AND THE P/S CONVERTER Make sure that no dust gets on the optical components such as the Polarizer Unit, the Field Lens, the Relay Lens, the Condenser Lens, the Dichroic Mirror, the Full Mirrors, the Integrator and the P/S Converter. Clean these optical components with cleaning paper moistened with pure ethyl alcohol or a lens cleaner which contains no water or oil. THE LCD PANEL OF THE LCD/PRISM UNIT 1) Clean the surface of the LCD Panel of the LCD/Prism Unit with an air blower or wipe with a clean, or soft blush lightly. 2) If any dirt remains, lightly wipe the surface with a cotton swab moistened with pure ethyl alcohol or a lens cleaner which contains no water or oil. Use a new swab after each wiping so that dirt will not be re-deposited on the surface.
11
Fig. 6-2
|
|
|
> |
|