|
There are currently no product reviews.
 ;
Excellent quality service manual. Quick processing, fair prices. Love to do business again. Thank you!!!
;
Excellent service manual, the only known point of note is the alignment of improvability scanned pages within the pdf page. The resolution is good.
;
I was very glad recieving the service manal from You. Additionaly very fast. Extremaly nice servicing. Thanks very mach! Now my GX-220 working better, than it was made. Alexander from Moscow, Russia/
;
Sweet! I won the item on eBay and couldn't adjust the geometry or even keep a steady picure. This guide has the full schematics (not available anywhere else as far as I could tell), and was a bargain for the wealth of knowledge it contains. I hooked it up to my testing equipment, tweaked a few potentiometers and got it playing videogames in no time. Thanks!
;
It was just what I need to fix my old BMW's CD player. Very convenient also. Thank you.
PT-52LCX66 / PT-56LCX66 / PT-61LCX66 / PT-52LCX16 / PT-56LCX16
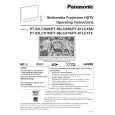
3. 1) Remove the Top Duct 3 Unit by removing the 4 Screws (421). CAUTION: When removing the Screws (421) on the Top Duct 3 Unit, plastic dust may be produced. Therefore, confirm that there is no dust on the Top Duct 3 Unit. If there is dust, clean the Top Duct 3 Unit with a brush, etc. Otherwise, dust may adhere to the inside of the screen. 2) Remove the Lamp Unit by turning the Knob.
Top Duct 3 Unit
421
Knob
421
Lamp Unit
LVDS Cable
21 Projection Unit
Fig. D2-2
Replacement Note of Projection Unit: 1. After replacing the Projection Unit, be sure to perform "ADJUSTMENT of Projection Unit." Refer to "WHEN INSTALLING THE PROJECTION UNIT OR THE BASE BODY UNIT INTO THE UNIT AT THE USER�S LOCATION:." 2. These parts will be necessary when replacing. Set aside, keep, and re-use. - Top Duct 3 Unit - Lamp Unit
37
|