|
There are currently no product reviews.
 ;
It is great, it saves money and paper. It helps me to save room and recources.
;
manual service is ok , resolve the problems
manual service is ok , resolve the problems
manual service is ok , resolve the problems
manual service is ok , resolve the problems
manual service is ok , resolve the problems
 ;
Well I got all the necessary specifications for the job. Document of good quality and good definition of the diagrams
;
hi .full information for JVC GRVF1EG Service Manual its compete .Thank You
;
perfect and good copies, all good readable.
within 24hrs and very cheap also.
PV-D300 / VM-D100 / PV-L550 / PV-L600 / PV-L650 / VM-L450
5.1.7.
CAUTION:
HOW TO REMOVE A JAMMED TAPE
If loading does not start after DC Power Supply is applied, DO NOT continue applying DC Power Supply.
5.1.7.1.
Remove a jammed tape as follows:
1. Remove a Screw and remove the EVR Cover.
Fig. 4-2
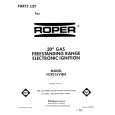
5. Open the Cassette Cover fully.
Fig. 4-1
6. Remove the tape slack by rotating the Takeup Reel Gear of the cassette tape as shown in Fig. 4-3.
2. Place the unit with the Cassette Cover facing upward. 3. Connect the TP Board Kit through the TP Board slot. 4. Apply +3VDC Power Supply to TP20 (+) and TP21 (-) on the TP Board to unload the mechanism. It normally takes approx. 6 seconds to unload the Mechanism to EJECT position. Then, remove the Power Supply and remove the TP Board Kit.
Fig. 4-3
7. Take out the cassette tape. 8. Connect the Power or Battery to set the Mechanism to STOP Position.
20
|