|
|
|
Categories
|
|
Information
|
|
Featured Product
|
|
|
 |
|
|
There are currently no product reviews.
 ;
Thanks for offering this item at such a good price. Proved handy in identifying the part I was looking for my set.
;
Thr Video Recorder i have is quiet Old and the Producer could Not help me. So i w as very glad to find an offer for the owners Manual for a very fair Price.a I obtained the original Manual very quick and I am happy to have it now.
 ;
The PDF copy was immediately available on download after the payment. However, I noticed that the document was in German, and Ihad to contact a German translator to get it translated it to English. The quality of document is legible can be used for my purpose.
;
The manual was complete and of great quality. Originally a tri-lingual file, I first received only one language. After a note to owners-manuals.com, I quickly received the remaining languages... Great service, definitely worth it.
;
Thank you for providing this manual and at low cost.
The Philips scope is of excellent quality, longevity and build and had a couple of faults
when it was passed to me. Having the CCT diagrams is a blessing.
I have fixed the problems and also modded the scope to my requirements.
I have built a 24v Li-Ion pack for portable use from old but good laptop batts.
it is working beautifully and I am well pleased. Keep up the good work Guys.
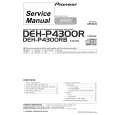
Copying Your Tapes (Dubbing)
Connection
(Rear connection shown.)
VCR (HiFi)
IN FROM ANT.
VCR (HiFi)
TV OUT TO TV R L
R L
AUDIO OUT AUDIO IN VIDEO OUT
R L
VIDEO IN
VHF/UHF
Front of VCR
VIDEO IN 2
L-AUDIO IN2-R
(Front Audio L/R Video IN jacks are also provided)
1 2
Connect VIDEO OUT jack on Playing VCR to VIDEO IN jack on Recording VCR. To monitor the dubbing, also connect a TV as shown. Connect AUDIO L/R OUT jacks on Playing VCR to AUDIO L/R IN jacks on Recording VCR.
In place of a Playing VCR, you can use other equipment, such as a Camcorder. Simply connect the unit�s Audio/Video outputs to the Recording VCR.
Playing (Source) VCR
Recording (Editing) VCR
Insert blank tape with record tab. Press INPUT* to set VCR Input mode to LINE1 for Video Input (Rear) or to LINE2 for Video Input (Front). (See �Selecting the Input Mode� below.)
1 2
Insert pre-recorded tape.
3
Press PLAY, then PAUSE/SLOW immediately to enter PLAY/PAUSE mode.
Press REC, then PAUSE/SLOW immediately to enter REC/PAUSE mode.
The operation of steps 4 and 5 must be done on both playing and recording VCRs at the same time.
4 5
1 2
Press PLAY to start dubbing. Playing VCR starts playback.
Press PAUSE/SLOW to start dubbing. Recording VCR starts recording.
Press STOP to stop dubbing.
Press STOP to stop dubbing.
To Monitor Dubbing on Your TV
Turn your TV on and tune to the Recording VCR channel (CH3 or CH4). Set the VCR/ TV Selector on the Recording VCR to �VCR.�
Selecting the Input Mode
Method 1: Press INPUT repeatedly. Channel Number � LINE1 � LINE2 Method 2: Press CH /. Display will change as below.
Note
� Dubbing tapes protected with Copy Guard will have poor quality results.
1 LINE2
2 LINE1
3 (CABLE) (TV) 125 or 69
� � L1� or �L2� lights on Multi-Function Display (about 4 sec.) when LINE1 or LINE2 is selected. � LINE1: For rear audio/video connection. LINE2: For front audio/video connection.
Caution : Unauthorized exchanging and/or copying of copyrighted recordings may be
copyright infringement.
*Important: If a remote control button does not work when pressed, press the VCR button on the remote and try the button again. -9-
|
|
|
> |
|