|
|
|
Categories
|
|
Information
|
|
Featured Product
|
|
|
 |
|
|
There are currently no product reviews.
 ;
Exactly as described, the full user-manual (145 pages). Perfect.
<P=004>
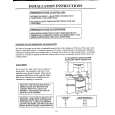
CASSETTE OPERATION
G 1 2
RADIO OPERATION
s General information
q For playback, use normal or low-noise tape for the best sound. (Metal or CrO2 tape is not recommended.) For recording, use only normal tape. q Do not use C-120 tapes, tapes with large diameter reels, or poor-quality tapes, as they may cause malfunctions. q Before loading a tape into the cassette compartment, tighten the slack with a pen or pencil. q Cassettes have removable tabs which prevent accidental recording or erasing from taking place. Removing the tab will protect the corresponding side from being erased. Cover the tab holes with adhesive tape to erase or record again.
Side A (1)
Set the FUNCTION switch to AM or FM AUTO.
Use the TUNING control to tune in to the desired station. q The built-in FM AUTO function automatically changes reception to monaural if the signal is weak during FM stereo reception. q Although the reception changes to monaural, the sound becomes clearer. After use: Set the FUNCTION switch to STAND-BY.
Aerial adjustment FM AM
Tab for side B (2)
Tab for side A (1)
RECORDING
F s Tape playback 1 2 3 4
Set the FUNCTION switch to TAPE. Load the cassette into the cassette compartment. Press the PLAY button. To advance the tape, press the STOP/EJECT button, then press the F FWD button. To rewind, press the STOP/EJECT button, then press the REWIND button.
q When recording important selections, be sure to make a preliminary test to ensure that the desired material is being properly recorded. q The ALC (Automatic Record Level Control) circuit automatically controls the level of the input signal used for recording. q The VOLUME and X-BASS controls may be adjusted with no effect to the recorded signal. (Variable Sound Monitor) q Metal and CrO2 tapes cannot be used for recording.
H s Recording
To interrupt playback: Press the PAUSE button during playback. Press the PAUSE button again to resume playback. To stop playback: Press the STOP/EJECT button. Precautions: q Be sure not to press the PLAY and REWIND buttons simultaneously, or the tape will become damaged. q Before changing from one tape operation to another, press the STOP/EJECT button. q Do not press the PAUSE button whilst the fast forward or rewind operations are in progress. The F FWD or REWIND button will not be released when the tape end is reached. Once this occurs, press the STOP/EJECT button.
from the built-in CD
player
1 2 3 4
Set the FUNCTION switch to CD. Load the cassette into the cassette compartment. Press the RECORD button. Press the PLAY/REPEAT button on the CD.
Notes: q To record a specific track, press the UP or DOWN button on the CD player until the desired track number is displayed, and then start recording. q If the STOP or PLAY/REPEAT button on the CD player is pressed whilst recording, or if the CD comes to its end, the tape deck will not stop.
E-4
QT-CD111H/110H(SEEG) TINSZ0001SJZZ
|
|
|
> |
|