|
|
|
Categories
|
|
Information
|
|
Featured Product
|
|
|
 |
|
|
There are currently no product reviews.
 ;
Very fast, clear and usefull site !
Also this Service Manual are very well maked and with a very good definition !
Very fast download speed !
Recomended Seller !
;
The manual you sent me was excellent. It included clear, readable diagrams and a usable parts list. I would surely use your service again. Thanks
;
Payments were processed quickly and items were exactly as described. I will use owner-manuals.com in the future for any other manual needs.
;
The Technics manual was very clear and I was able to solve my technical problems.
I did not think that anyone kept these manuals and was pleasantly surprised to find them on the Internet and at an affordable price.
I would recommend Owner Manuals as a first source of technical products for ‘dated’ equipment manuals.
Ian
;
The content of the manual was not found on the Internet and was a hard find. I check the net for 5 hours until I came across this web-site. When I did find the book it Auto loaded into my IPAD PDF shelf for books for review at anytime. Overall I am satisfied with the book and it answered all my questions. This repair book is obsolete because the product I bout it for is pretty old. Thanks for the help with the download and even having the manual. Thanks 73's K5HRD
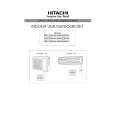
HOW TO SET THE TIMER
Time, Day, Month After you change the batteries;
1 Set the current month and
day with the TIMER control button.
TIME, DAY, MONTH (current time, day, month)
M
D
M
D
OFF TIMER
RESET
ON TIMER RESERVE CANCEL
OFF-Timer
1 Press the
button. The on the display.
Start
(OFF-TIMER) (OFF) mark blinks
AM
STOP
You can set the device to turn off at the present time.
ON-Timer
Stop
Start
1 Press the (ON-TIMER) button. The (ON) mark blinks
on the display.
G
The device will turn on at the designated times.
AM
ON/OFF-Timer
Start Stop
(ON-OFF) button so that the (OFF) mark blinks.
1 Press the
2 Set the turn-off time
with the TIMER control button. Press the (RESERVE) button.
PM
Press the (ONTIMER) button so that the (OFF) mark lights and the (ON) mark blinks.
PM
3
G The device will turn on (off) and off (on) at the designated times. G The switching occurs first at the preset time that comes earlier. G The arrow mark appearing on the display indicates the sequence of switching operations.
PM
AM
How to Cancel Reservation
Point the signal window of the remote controller toward the indoor unit, and press the (CANCEL) button. The (RESERVED) sign goes out with a beep and the (TIMER) lamp turns off on the indoor unit.
NOTE
You can set only one of the OFF-timer, ON-timer and ON/OFF-timer.
� 20 �
|
|
|
> |
|