|
|
|
Categories
|
|
Information
|
|
Featured Product
|
|
|
 |
|
|
There are currently no product reviews.
 ;
Hello from Germany - thank you very much for the manual for my Sharp "Searcher" - the handling of your internet area is outstanding..Mike
;
I am very happy with the owner's manual. I bought a used Casio and was so relieved that I was able to get a hold of a owner's manual. It was very easy to download the manual and I had no problems with printing it. Thank you! Nancy Whalen
;
The purchased manual is an high-quality scan of the original JVC paper-based Owner´s Manual. I am very satisfied!
;
Very satisfied with received document, all is right, Thank You very much, it was a Pleasure to work with You.
 ;
great site, the most easy and fastest way to find the manual you need, no 5 star because the manual was only available in german, but I speak german as well so no problem for me.
Adjusting
the oven temperature
control
Although your new oven is properly adjusted to provide accurate temperatures, it may cook faster or slower than your old oven. If, after using the oven for a period of time, you are not satisfied with the baking/roasting results, you can change the temperature calibration by following these steps:
Single/upper
oven:
1. Push the Bake pad and hold for 4 seconds. The display will show the current offset temperature, for example �OO�, if you have not previously adjusted the temperature. 2. To adjust the temperature, use the Temp pad(s). Push A to raise the temperature or V to lower the temperature in 5°F increments. You can set the temperature change to as low as -35°F or as high as +35�F. A minus (-) sign will appear before the number when decreasing the temperature setting to show the oven will be cooler by the displayed amount. 3. After making the desired adjustment, push any command pad to enter the new offset temperature.
Lower
oven
(double
ovens):
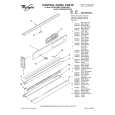
1. Make sure the Oven Temperature Control Knob is turned to the off position. Pull knob straight off and flip it over.
2. Loosen the locking screws inside the control knob. Note the Position of the notches. 3. To lower the temperature, hold knob handle firmly and move the tooth a notch counterclockwise. Each notch equals about 5°F (2.5%). 4. To raise the temperature, hold knob handle firmly and move the tooth a notch clockwise. Each notch equals about 5°F (2.5%). 5. Tighten the locking screws and replace the control knob.
Locking
.Th
Notches
14
|
|
|
> |
|