|
|
|
Categories
|
|
Information
|
|
Featured Product
|
|
|
 |
|
|
There are currently no product reviews.
 ;
Excellent, very professional, fast, reliable, congratulations thank you.
;
Excellent printing quality.
A complete and very usefull service manual with all details.
GREAT SERVICE AT VERY LOW PRICE!
A+++++++++++++++++++++++++
;
Excellent printing quality.
A complete and very usefull service manual with all details.
GREAT SERVICE AT VERY LOW PRICE!
A+++++++++++++++++++++++++
;
SATELLIT 4000 GRUNDIG
Service Manual
high quality. good graphics. prompt service.
;
Excellent printing quality.
A complete and very usefull service manual with all details.
GREAT SERVICE AT VERY LOW PRICE!
A+++++++++++++++++++++++++
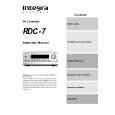
Front panel facilities
To use the same input source for the both the main and remote zones, press the Zone 2 button twice in succession. Note: The Rec Out and Zone 2 buttons use the same circuit and therefore cannot be used at the same time. when Zone 2 is selected, the currently selected input source is output from the recording terminal.
Remote controller
Memory
This button only operates when FM or AM is selected as the input source. This button allows you to preset frequencies for stations when using the FM/AM tuner. You can preset up to 40 stations (or frequencies) to be used with the PRESET buttons.
EXIT
Set the new settings and return to the previous menu screen.
RETURN
Returns to the DVD menu screen when the DVD mode is selected.
TRACK Menu, , , Enter, , , Exit
These buttons are used with the On Screen Display (OSD) menu. They also perform the same functions as the OSD MENU, (upper edge of ENTER button), (lower edge of ENTER button), (left edge of ENTER button), (right edge of ENTER button), ENTER, and EXIT RETURN buttons on the remote controller. Menu: Press to bring up the OSD menu. Exit: Press to exit the OSD menu when at the Menu Screen, or move to one screen previous to the one that is displayed if at any other screen. and : When selecting items in the OSD Menu, press these buttons to move the on-screen cursor (or the highlighted portion) upward and downward. and : When setting parameters in the OSD menu, press these buttons to select parameter values or modes. Enter: Press to display the screen for the selected item in the OSD Menu. Note for European models: These buttons are also used to set programs and finish scans when performing a PTY or TP scan with the RDS broadcasts. Selects a CD track when the CD mode is selected.
Off
When not using either Rec Out or Zone 2, press that button and then press the Off button to turn off the signal. If the Rec Out or Zone 2 signal is turned on and the connected component is not turned on, the electric signal will still be sent through the circuitry and the excess load may cause deterioration of the audio signal.
CD/TAPE/DVD/MD operation buttons
Operates other Onkyo and Integra components.
Input Selector buttons
Selects an input source. DVD: DVD, CD:CD,T1:Tape1, T2:Tape2, TUN:AM/ FM, PH:Phono, V1:Video1, V2:Video2, V3:Video3, V-: Use this button in conjunction with a numeric button to select Video 1 through 5.
DSP
Press these buttons to scroll through the listening modes and set a new one for the input source you are currently listening to. For each different input signal, different listening modes are possible.
1-9, 0, +10
AUDIO TRACK DISC MUTING
Numeric key. The +10 button changes the value of the 10's digit.
Re-EQ
Selects the Re-EQ mode.
LATE NIGHT
Selects the late night mode.
REC OPEN/COLSE
Dimmer (other than European models)
Press to set the brightness of the front display. There are 4 settings available: normal, dark, very dark, and off. ¥ The dimmer control for the front display can be performed at the remote controller.
DIMMER
Adjusts the display brightness.
DVD T1 V1 STEREO T2 V2 TUN V3 DSP
CD PH V�
STNBY
Turns the RDC-7 in standby. Be aware that pressing the STNBY button only places the RDC-7 in standby and does not turn the power completely off.
5
RT/PTY/TP (European models only)
This button is only available on European models. Use this button to help tune into the Radio Data System (RDS) for FM broadcasting. RDS was developed within the European Broadcasting Union (EBU) and is available in most European countries. Each time the button is pressed, the display changes from RT (radio text) to PTY (program type) to TP (traffic program) and then back to RT again.
PHONES
This is a standard stereo jack for connecting stereo headphones. The audio for the front right and left speakers are sent to the headphone speakers. When the headphones are plugged in, the listening mode automatically changes to stereo and output to the speakers is stopped.
DIRECT
1
SURROUND
2
THX
3
DSP
LIGHT
Illuminates the buttons.
4 7
5
6
Re-EQ
CH SEL
LEVEL +
MODE MACRO
Programming or running a macro function.
8
DIMMER
9
LEVEL �
LATE NIGHT
+ 10
0
ENT
OSD
Brings up the OSD menu.
HOME THEATER CONTROLLER
MENU
Displays the menu when the DVD mode is selected.
RC-418M
Tuning
Use these buttons to change the tuner frequency. The tuner frequency is displayed in the front display and it can be changed in 50 kHz increments for FM and 9 kHz increments for AM. When a station is tuned into, � <�or � > �will appear in the front display. When FM is selected, you can hold down one of the tuning buttons and then release it to activate the autosearch feature. It will search for a station in the direction of the button you pressed and stop when it tunes into one.
Front panel display Listening mode or digital input format indicators
ENTER/cursor VOL SEND/LEARN indicator
Lights red when a signal is emitted from the remote controller. Adjusts the volume.
TEST
Outputs a test tone for setting speaker levels.
Multi function display
LCD display
Displays the input and operating status.
TV/VCR
Used to program the signals from remote controllers for other components. Program the TV/VCR switching mode.
ON
Turns on the RDC-7.
Preset
When AM or FM is selected as the input source, press one of these buttons to jump to a radio station that you preset using the MEMORY button. Pressing the right button moves from the most recently preset station to older ones, and pressing the left button moves in the reverse order.
Sleep indicator
SLEEP
Sets the sleep function.
MUTING DISC
Activate the mute function. Selects a disc in the CD changer when the CD mode is selected.
DIRECT MACRO Input source format indicator
Programming or running a direct macro function.
OPEN/CLOSE MODE buttons Video display DISPLAY
Changes the display. Sets the remote controller into the mode for the device corresponding to the button pressed. Open and close the front door.
Listening mode buttons
FM Mode
If you are listening to an FM radio station in stereo and the sound cuts out or there is a great deal of noise, then press this button. The � MONO �display will appear and the output will change to mono. Though you will not hear the audio in stereo, this may stop the sound from cutting out and reduce excess noise.
Pressing these buttons to change the listening mode directly.
RDC-7
DVD SET
Brings up the DVD setup menu when the DVD mode is selected.
Speaker output level setting buttons
Use to set the speaker output levels.
ENT
Enters numerical values and settings when either the MD or DVD mode is selected.
CH
Selects the tuner preset stations.
 $4.99 RDC7 INTEGRA
Owner's Manual Complete owner's manual in digital format. The manual will be available for download as PDF file aft…
|
|
|
> |
|


