|
|
|
Categories
|
|
Information
|
|
Featured Product
|
|
|
 |
|
|
There are currently no product reviews.
 ;
Perfect copy of the service manual. you can enlarge every page, and it comes up
with all details.
;
It´s very very nice manual with all, what i need. Original in good quality. Very fast business. Very much thanks...
;
Purchased the manual that I was looking for at a great price and could download it easily.. Great service experience and for future purchases I plan to use the site.
Thank you very much
;
Exactly what was needed to assess the product - excellent value and great service
;
A site where discontinualed schematic diagrams and back dated information can be found on discontinued radios tv's and any electronic equipment can be found. Newer manuals either Service and operating manuals. Radio amateurs should find this site a great source for ham radio equipment manuals. I will return to this site should I need information on any electrical equipment. priced easy to download in a PDF format and print pages need to undertake the repair.
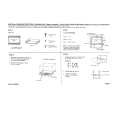
5. FEHLERSUCHE
3.
E401 (Rechtseinzug)
Schritt 1 Prüfung Das Multimeter auf den 20 V DCBereich einstellen und die Prüfspitzen mit J8-6 (+) und J8-5 (-) auf dem RDF-Controller-PCB verbinden. Die Unterbrecherplatte auf der Einzugswalzenachse mit der Hand bewegen. Beträgt die Spannung ca. 5 V, wenn das Plättchen am Sensor und ca. 0,7 oder weniger, wenn es nicht am Sensor ist? Das Multimeter auf den 20 V DCBereich einstellen und die Prüfspitzen mit J10-12 (+) und J10-11 (-) auf dem RDF-Controller-PCB verbinden. Wechselt die Spannung zwischen 5 V und 0,7 oder weniger, wenn die Taktscheibe langsam gedreht wird? Das Multimeter auf den 20 V DCBereich einstellen und die Prüfspitzen mit J17-12 (+) und J17-2 (-) auf dem RDF-Controller-PCB verbinden. Steigt die Spannung zum Einzugszeitpunkt von 0 auf 24 V? Das Multimeter auf den 200 V DC-Bereich einstellen und die Prüfspitzen mit J18-1 (+) und J182 (-) auf dem RDF-Controller-PCB verbinden. �ndert sich die Spannung auf ca. 22 V, wenn die StartTaste betätigt wird? Ergebnis Nein Ma�nahme Die Verkabelung vom Heimpositionssensor der Einzugswalze (S21) zum RDF-Controller-PCB überprüfen. Ist sie in Ordnung, den Heimpositionssensor der Einzugswalze (S21) ersetzen.
Ursache Heimpositionssensor der Einzugswalze (S21)
Einzugstaktsensor (S9)
2
Nein
Die Verkabelung vom Einzugstaktsensor (S9) zum RDF-ControllerPCB überprüfen. Ist sie in Ordnung den Einzugstaktsensor (S9) ersetzen.
Einzugskupplung (CL1)
3
Nein
Die Verkabelung der Einzugskupplung (CL1) zum RDF-Controller-PCB überprüfen. Ist sie in Ordnung, die Einzugskupplung (CL1) ersetzen. Die Verkabelung vom Einzugsmotor (M4) zum RDF-ControllerPCB überprüfen. Ist sie in Ordnung den Einzugsmotor (M4) ersetzen. Den RDF-ControllerPCB ersetzen.
Einzugsmotor (M4)
4
Ja
Nein
COPYRIGHT © 1995 CANON INC. CANON RDF-D1 REV.0 M�RZ 1995 PRINTED IN GERMANY
5 - 41
 $4.99 RDF-D1 CANON
Parts Catalog Parts Catalog only. It's available in PDF format. Useful, if Your equipment is broken and You need t…
|
|
|
> |
|