|
|
|
Categories
|
|
Information
|
|
Featured Product
|
|
|
 |
|
|
There are currently no product reviews.
 ;
the manual was just what i wanted it had all the revelent information required to operate the hifi .Iwould use any manual i downloaded for any item which needs a manual
;
Die gewünschte Bedienungsanleitung wurde vereinbarungsgemäß in deutsch bereitgestellt. Sie ist gut lesbar. Kein Kauderwelsch.
Danke für den Service.
;
GOOD SERVICE MANUAL GOT ALL THE INFO. THAT I NEEDED..
;
Excellent product and service. I bought a second-hand Casio CPS-60 keyboard which had no manual. Packed full of features which I had no idea how to operate . . .
Google search found this site (and others with the same manual for sale for $8.99!)
I bought the manual and within an hour the download was available. Quality of the scanned images is good - very clear - and the PDF has been created with the pages in the correct order.
I would definitely use this site again.
;
I found this rare manual, in french ! The brand of my washing machine is not famous but this site had the manual, that is perfect.
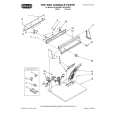
Using
(Available
the drying
as an accessory
rack
on some models)
5. Select the Timed drying cycle (and temperature if needed) or the No Heat/ Fluff or Air cycle (see pages 7-8). 6. Press the Start Button.
The drying rack lets you dry items that you may not want to tumble. The rack does not move, but the drum turns. 1. Fit rear legs of the rack into indentations in the back wall of the dryer.
2. Lower the front so the legs rest on the dryer opening. 3. Put wet items on top of the rack. Leave space between the items so air can reach all surfaces. NOTE: Make sure nothing hangs over the edge of the rack. 4. Close the door.
NOTES: l See the chat-t below for suggested cycles and settings for the different types of items that might best be rack dried.
l
l
The rack must be removed for normal tumbling. Drying time will depend on how much moisture the items hold. The following chart suggests drying times.
RACK DRY Wool sweaters (Block to shape and lay flat on ,the rac:k) Stuffed toys or pillows (Cotton or polyester fiber filled) Stuffed toys or pillows (Foam rubber filled) Sneakers or canvas shoes *Reset cycle as needed to complete drying.
CYCLE Timed
TEMPERATURE LOW
TIME� (minutes] 60
Timed No Heat/Fluff or Air
LOW None; cycle is unheated.
60 90 30-40
11
|
|
|
> |
|