|
|
|
Categories
|
|
Information
|
|
Featured Product
|
|
|
 |
|
|
There are currently no product reviews.
 ;
Very well done!!!!! congratulations. It was a bit longer than usual the wiating time even if it was on time (in 24 hours).
;
Last week I bought a second hand BAUKNECHT TRK4850 DRYER. It is a professional machine with many programs and switch options. I feared it would be a huge quest to find a manual. I was delighted when I found owner-manuals.com. After payment I received the file to download the next day already. The quality is great. I am very happy. Thanks!
but kindly the distributions of the operating programs not find in the owners manual,can you help me to understand the operating programs instructions thank you
;
Very good copy, very readable and easy transaction as always.
;
It is perfect, exactly what we needed. It's like the paper version but less clutter.
 ;
Received my manual within 24 hours. Very clear scan of the manual I needed. Thanks!
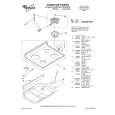
Adjusting
the oven temperature
control
Oven temperature controls will gradually shift after years of use. So, even though your new oven is properly adjusted to provide accurate temperatures, it may cook faster or slower than your old oven. If, after using the oven for a period of time, you are not satisfied with the temperature settings, you can change them by following these steps: 1. Turn the Oven Temperature Control Knob to the off position. Pull knob straight off and flip it over.
2. Loosen
the locking screws inside the control knob. Note the position of the notches.
Locking screws
TooHI /
3. To lower the temperature,
hold knob handle firmly and move the tooth a notch counterclockwise. Each notch equals about 5°F (2.5%).
4. To raise the temperature,
hold knob handle firmly and move the tooth a notch clockwise. Each notch equals about 5°F (2.5%). the locking screws and replace the control knob.
Notches
5. Tighten
Broiling
1. Position the rack properly before turning on the oven. Position rack so that the surface of the food is at least 3 inches (7.4 cm) away from the broil element. See �Broiling rack position chart� on page 14.
2. Put the broiler pan and food on the rack. 3. Close the door to the Broil Stop position
(open about 4 inches [lo.2 cm]). The door will stay open by itself.
4. Set the Oven Selector and Oven Tempera-
ture Control Knob to BROIL. The OVEN HEATING Indicator Light will come on. NOTE: Do not preheat oven when broiling.
|
|
|
> |
|