|
There are currently no product reviews.
 ;
Exactly as described, the full user-manual (145 pages). Perfect.
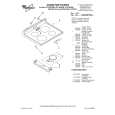
Broiling
1. Position the rack before turning the oven on. See �Broiling rack position chart� on page 15. 2. Put the broiler pan and food on the rack. 3. Close the door to the Broil Stop position (open about 4 inches [lo.2 cm]). The door will stay open by itsetf. 4. Set the Oven Selector and Oven Temperature Control Knob to BROIL. The OVEN HEATING Indicator Light will come on. NOTE: Do not preheat oven when broiling. 5. When broiling is done, turn both the Oven Selector and Oven Temperature Control Knob to OFF. The OVEN HEATING Indicator Light will go off.
Custom
l
broil
l
l
If food is cooking too fast, turn the Oven Temperature Control Knob counterclockwise until the OVEN HEATING Indicator Light goes off If you want the food to broil slower from the start, set the Oven Temperature Control Knob between 170°F and 325°F (77°C and 163°C). These temperature settings allow the broil heating element to cycle and to slow cooking. The lower the temperature, the slower the cooking. Fish and chicken are some foods that may cook better if you use lower broiling temperatures. The Oven Selector must be on BROIL for all broiling temperatures. NOTE: Leave the oven door partly open whenever using the oven to broil. This allows the oven to maintain proper temperatures.
14
|