|
|
|
Categories
|
|
Information
|
|
Featured Product
|
|
|
 |
|
|
There are currently no product reviews.
 ;
It answered my question, which was how to load the paper. I did notice that the very end of the manual was not visible.
 ;
The product manual I received was exactly what I was looking for, delivered painlessly at a very fair price. I can't ask for any more than that.
;
Very well done!!!!! congratulations. It was a bit longer than usual the wiating time even if it was on time (in 24 hours).
;
Last week I bought a second hand BAUKNECHT TRK4850 DRYER. It is a professional machine with many programs and switch options. I feared it would be a huge quest to find a manual. I was delighted when I found owner-manuals.com. After payment I received the file to download the next day already. The quality is great. I am very happy. Thanks!
but kindly the distributions of the operating programs not find in the owners manual,can you help me to understand the operating programs instructions thank you
;
Very good copy, very readable and easy transaction as always.
cleaned In the Selt-Cleaning cycle, they become harder to slide. See page 25. Turn on a vent hood or other kitchen vent during the Self-Cleaning cycle. This will help remove heat and odors that are normal during the cycle.
l
l
l
l
l
l
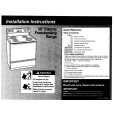
Personal Injury and Product Damage Hazard Do not touch the oven during the Self-Cleaning cycle. It could burn you. Do not use commercial oven cleaners in your oven. Cleaners may produce hazardous fumes or damage the porcelain finish. Do not force the Lock Lever, you could bend or break it. The lever is designed to stay locked until the oven is cool enough to safely open. Wait until it moves freely. Do not use foil or other liners in the oven. During the Self-Cleaning cycle foil can burn or melt and damage the oven surface. Do not block the vent during the Self-Cleaning cycle. Air must move freely for best cleaning results. Do not leave plastic utensils near the vent. They may melt.
Setting the controls 1. Make sure the clock is set to the right time of day. (See �Setting the clock� on page 8.) 2. Move the Lock Lever all the way to the right-the Clean position.
21
|
|
|
> |
|