|
|
|
Categories
|
|
Information
|
|
Featured Product
|
|
|
 |
|
|
There are currently no product reviews.
 ;
Thank´s for your help, I already recived these manual from you
;
Thank you for your manual It has the basic things to and i use the Oszi for Longer Time.
THX
;
Actually, I was looking for this information for 3 years!...now thanks to you, the manual is on my hands and of great help, cause I understand now where I was doing wrong connections and wires...excellent, I'll be back to you if in need, thank you.
 ;
This manual covers the main equipment features only. While it also includes the procedure for saving and loading from the now long obsolete memory cards it does not mention the how to operate with the optional floppy drive interface so I am still at a loss about how to use this! Note that there is a separate manual covering the MIDI interface and programming via the keyboard, not included in this download. You will also need to get hold of this if you want to use the MIDI interface properly. Basically there is little difference between this manual and the free to download manual for the similar PR60 model.
;
Good list of manuals. I found a very rare one and easily get. Should be promptly to download, as we must to wait hours even after confirmed payment.
6
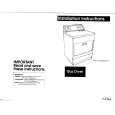
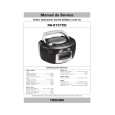
OPERA��O DE GRAVA��O
PARA EVITAR APAGAMENTO ACIDENTAL
Qualquer nova gravação apaga automaticamente a anterior. Se você quiser manter as gravações, em um ou ambos os lados da fita, remova as lingüetas na parte de trás da fita. Uma vez feito isso, a tecla REC estará travada. Caso queira gravar em uma fita que não tenha as lingüetas de segurança, coloque uma fita adesiva sobre a abertura.
GRAVA��O B�SICA
1. Coloque o seletor FUNCTION na posição de onde você quer gravar, "RADIO" ou "CD". 2. Coloque uma fita cassete em branco. 3. Pressione a tecla PAUSE e em seguida a tecla REC. A tecla PLAY automaticamente acompanha a tecla REC. 4. No inÃcio da música ou programa, pressione a tecla PAUSE e a gravação se inicia. Para parar momentaneamente, pressione a tecla PAUSE outra vez. Para parar a gravação, pressione a tecla STOP/EJECT. 5. No final da fita a gravação irá parar automaticamente.
Notas:
Â� Os nÃveis de gravação são pré-ajustados de fábrica e não podem ser alterados. Â� O seu aparelho pode gravar em fitas normais; fitas CrO2 ou de metal não podem ser usadas. Â� Quando estiver gravando uma transmissão AM, se ouvir ruÃdos de batimento, tipo apitos, coloque a tecla BEAT CUT, localizada na traseira do seu aparelho, na posição A ou B, dependendo da que melhor reduzir os ruÃdos.
|
|
|
> |
|