|
|
|
Categories
|
|
Information
|
|
Featured Product
|
|
|
 |
|
|
There are currently no product reviews.
 ;
Correct manual received and of good quality but the contents of the file for the Service Manual for the same monitor is for a 20" TV not the RGB Monitor.
;
The owners manual for the Pioneer VSX-D603S was exactly what I needed. I received it in a timely manor and it was priced fairly. I definately will use your servise again. Thank You
;
This is a great manual. It was easy to read and very accurate. The size of the manual is small so email is no problem. I highly recommend it. The manual is very hard to find other than this website.
;
Manual was complete and available promptly, since I had lost my original manual. Very good response.
;
Whilst this is a photo copy, and some of the pages are a little askew, it was all readable and intact. A real bonus finding an old manual for a classic piece of kit that no other site had.
Great stuff.
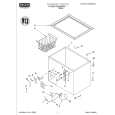
Choosing
the proper
location
Read the following items before choosing the location for the freezer. See �Completing the installation� below before sliding freezer into place. 1. Pick a safe place, indoors, away from flammables such as gasoline. 2. Check the strength of the floor. It should hold the weight of a fully loaded freezer. 3. Allow at least 3 inches (7.5 cm) of air space on both sides of the freezer and 2 inches (5 cm) between the back of the freezer and the wall. Leave room above the freezer to open the lid. 4. It should not be necessary to remove the lid during installation. If, for any reason, the hinges need adjustment, see the label on the back of your freezer and contact an authorized Roper service company. Do not cover the freezer with items such as blankets, sheets, tablecloths, etc. This reduces air circulation.
NOTE:
Room to open Ild
2 inches at back
Completing
the installation
Level the freezer from side to side and front to back so that the lid will seal properly. Use shim(s) to level the freezer if necessary.
Installing
(on some
the defrost
drain cover
models)
1. Remove defrost drain cover from the
literature package. 2. Push drain cover into drain hole as illustrated.
6
|
|
|
> |
|