|
|
|
Categories
|
|
Information
|
|
Featured Product
|
|
|
 |
|
|
There are currently no product reviews.
 ;
Хорошее качество сканирования.
Мануал пришел часов эдак через 12. В целом доволен.
 ;
Fantastic quality and impressive delivery time. Based on this manual, I recommend this service without hesitation! Five Stars for certain.
;
Was happy to find the complete owners manual... It's all in there, just like the original...
;
Thanks for offering this item at such a good price. Proved handy in identifying the part I was looking for my set.
;
Thr Video Recorder i have is quiet Old and the Producer could Not help me. So i w as very glad to find an offer for the owners Manual for a very fair Price.a I obtained the original Manual very quick and I am happy to have it now.
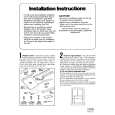
2. Cholslr b fen&We approprlk. D�abord, decider quelle est la pike (quelles sont les pieces) $I refroidir. Puis choisir une fenQtre qui permettra a l�air climatise de circuler librement et directement dans la(les) pike(s) A refroidir. Souvenez-vous, il est difficile de deplacer de I�air autour des coins. Choisir une fenetre qui est 4galement proche d�une prise de courant Blectrique. (Voir �Exigences kctriques� en pages 3-7 pour les besoins concemant la prise de courant et le -Iage). Me pas ss sewlr de ralbnge. La fenGtre dans laquelle vous placez votre climatiseur devrait avoir une ouverture de 66 cm (26 po) de large au moins et de 50,8 cm (20 po) de haut au moins. Des pieces de pose standard sont foumies pour des fenetres & chessis B guillotine jury�& 137 cm (54 po) de large. 3. Enbver b panneau avant en poussant le haut du panneau vers le has et I�exkkieur. Ceci protege le panneau de dommages et facilite la manipulation du dimatiseur pendant I�installation. 4. Faire gllsser I�apparell hors de I�habllbge. Debrancher d�abord le fil de terre vert au coin avant gauche de la base de l�appareil en enlevant la vis de fixation (garder la vis pour la reutiliser & r&ape 18). Faire glisser maintenant Pappareil hors de l�habillage en tirant sur la poigrke & fa base de Pappareil.
Visdetildeterre
-rB
�Pobrde
5.
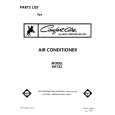
Fixer bs bandes dWancMtt4 a l�hablllage. Placer la bande d�kanch6it6 auto-adhkiie de 9,s mm &po) de large sur le tit6 fengtre de la bride du bas. Maintenant, en commen9ant au coin inferfew de I�habillage. appliquer les bandes d�6tafIddii6 de $5 mm (% po) de large sur la liine mediane des trous prBper&s pour une des comibres de montage laWal. sur la ligne mediane des trous pr& perch pour le profile en U 9 monter sur le haut. et sur la ligne mediane des trous pr& perCes pour I�autre corn&e de montage lateral.
15
|
|
|
> |
|