|
|
|
Categories
|
|
Information
|
|
Featured Product
|
|
|
 |
|
|
There are currently no product reviews.
 ;
Received my manual within 24 hours. Very clear scan of the manual I needed. Thanks!
 ;
Very clear scan, I recommend it. Definitely a must have for any 3362 owner.
Alpine could have written a slightly more complete manual, though. It's already pretty huge, but the unit has so many functions, I feel some more explanation would have been better.
Yamaha's manual of their comparable YDSP-1 is a little better in my opinion.
;
Immediate response with excellent service - highly reccommended
;
Correct manual received and of good quality but the contents of the file for the Service Manual for the same monitor is for a 20" TV not the RGB Monitor.
;
The owners manual for the Pioneer VSX-D603S was exactly what I needed. I received it in a timely manor and it was priced fairly. I definately will use your servise again. Thank You
/
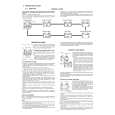
Loosen the locking screw; NOTICE position of notches.
Variable Broil Feature: You might want to broil some foods slower than others. Broiling can be slowed down by setting a lower temperature on the Oven Temperature Control Knob instead of �BROIL.� Using a lower temperature will cause the broil element to turn on and off during the broiling SO that the food broils more slowly. When the Oven Temperature Control Knob is on �BROIL,� the Broil Element heats all the time. Set the temperature lower and it heats some of the time. The lower the temperature setting, the shorter are the periods of heating. NOTE: The Oven Selector must be on BROIL and the door must be partly open for ail broilirig temperatures. Resetting the Oven Temperature Control: Does your new oven seem hotter or colder than your old oven? The temperatures in older ovens often shift very gradually, getting hotter or colder without the user really noticing the change. Your new oven is properly adjusted to provide accurate temperatures, but when compared to your old range, the new design may give you different baking results. If you think that the temperature setting on your range needs to be hotter or colder, you can adjust the Oven Temperature Control Knob by yourself. To adjust the setting, first pull the Oven Temperature Control Knob straight off. On the back, just across from the locking screw, are a row of notches on the black part of the knob and one tooth on the chrome part. To set your oven about lO�F(5�C) cooler, loosen the locking screw about two full turns and move the row of notches one notch closer to �LO.� To set your oven about lO�F(5�C) warmer, move the row of notches one notch closer to �HI.� Each notch equals about lO�F(5�C). Tighten the locking screw and put the knob back on the control panel.
Lower: move black part toward �LO.� One notch equals about 10°F (5%).
Oven rack positions Your oven has two racks. Always put the racks where you want them to be before you turn on the oven. To remove a rack, take hold of it on the front edge and pull it out until it stops. Then lift up the front edge and pull again. It will slide past the stops, out of the guides and out of the oven. To put it back, fit the back corners into the guides at each side of the oven and slide it in, keeping the front tilted up until the rack passes the stops in the rack guides. For: Baking Broiling Place Rack: On the second rack guide from the bottom or so food is in the center of the oven. So food is about the distance from the broil element suggested in the broiling timetable under �Using the Oven Controls.� On the bottom rack guides. So food is in the center of the oven.
Higher: move black part toward �HI.� One notch equals about 10°F (5°C).
Roasting LARGE cuts of meat Roasting SMALLER cuts of meat To remove rack, pull forward until rack stops, lift front and pull.
5
|
|
|
> |
|