|
|
|
Categories
|
|
Information
|
|
Featured Product
|
|
|
 |
|
|
There are currently no product reviews.
 ;
It is perfect, exactly what we needed. It's like the paper version but less clutter.
 ;
Received my manual within 24 hours. Very clear scan of the manual I needed. Thanks!
;
Very clear scan, I recommend it. Definitely a must have for any 3362 owner.
Alpine could have written a slightly more complete manual, though. It's already pretty huge, but the unit has so many functions, I feel some more explanation would have been better.
Yamaha's manual of their comparable YDSP-1 is a little better in my opinion.
;
Immediate response with excellent service - highly reccommended
;
Correct manual received and of good quality but the contents of the file for the Service Manual for the same monitor is for a 20" TV not the RGB Monitor.
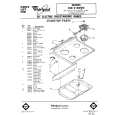
Removing and Replacing Oven Control Knobs: 1 Be sure the knobs are set to �OFF� 2 Pull each knob straight off. 3 Wash the knobs in warm.sudsy water. 4. The knobs are not interchangeable. Make sure you put the adjustable Oven Temperature Control Knob on the right place. and the nonadjustable Oven Selector Knob on the other. Removing surface units and reflector bowls: First. be sure the Surface Unit Controls are all �OFF� and that the surface units are cool. See where the surface units plug into the range? Lift each surface unit about an Inch (2.5 cm) at the edge away from the plug-in (receptacle). Pull the unit straight away from the plug-in. Do not wash surface units; they will burn themselves clean during normal use. Lift out the reflector bowls.
To remove surface unit. lift and pull straight out.
Replacing reflector bowls and surface units: 1 Be sure the surface unit controls are on �OFF.�
;: Hold when surface replacing. unit level
Put the reflector bowls back into their places. Make sure you can see the plug-ins (receptacles) for the surface units through the square hole in the side of each bowl. 3. Hold the surface unit level with the prongs (terminals) pointing at the plug-in. 4. Wrth the prongs started in the plug-in. start pushing in on the surface unit. At the same time. lift a little on the side of the surface unit that�s by the plug-in. 5. Make sure the surface-unit prongs are pushed into the plug-in as far as they will go. The surface unit will fit into the reflector bowl and be level when everything has been done right.
|
|
|
> |
|