|
|
|
Categories
|
|
Information
|
|
Featured Product
|
|
|
 |
|
|
There are currently no product reviews.
 ;
very helpful, the information in these manuels are very detailed
;
Please tell us what you think and share your opinions with others. Be sure to focus your comments on the product. You will receive $2.00 of store credit for Your review.
;
Please tell us what you think and share your opinions with others. Be sure to focus your comments on the product. You will receive $2.00 of store credit for Your review.
;
Good copy and great customer service! There was some confusion with my order and it was resolved promptly!
;
Having bought a pre-owned Sony FM stereo tuner through eBay, it came without any manuals. It soon became clear that to get the best from this excellent tuner I needed a decent manual because much of the operation was not intuitive to a newboy to hi fi like me. I managed to download the official Sony multi-lingual manual from Owner-Manuals.com with no problem at all - a really quick and easy service. I'm very glad I did because I found out all the operations of the tuner and was then able to not only set it up quickly but also to get much more from it that poke-and-hope trialling would ever achieve. In my book $4.99 very well spent.
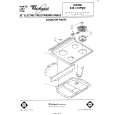
Removing and Replacing Oven Control Knobs: 1 Be sure the knobs are set to �OFF� 2 Pull each knob straight off. 3 Wash the knobs in warm.sudsy water. 4. The knobs are not interchangeable. Make sure you put the adjustable Oven Temperature Control Knob on the right place. and the nonadjustable Oven Selector Knob on the other. Removing surface units and reflector bowls: First. be sure the Surface Unit Controls are all �OFF� and that the surface units are cool. See where the surface units plug into the range? Lift each surface unit about an Inch (2.5 cm) at the edge away from the plug-in (receptacle). Pull the unit straight away from the plug-in. Do not wash surface units; they will burn themselves clean during normal use. Lift out the reflector bowls.
To remove surface unit. lift and pull straight out.
Replacing reflector bowls and surface units: 1 Be sure the surface unit controls are on �OFF.�
;: Hold when surface replacing. unit level
Put the reflector bowls back into their places. Make sure you can see the plug-ins (receptacles) for the surface units through the square hole in the side of each bowl. 3. Hold the surface unit level with the prongs (terminals) pointing at the plug-in. 4. Wrth the prongs started in the plug-in. start pushing in on the surface unit. At the same time. lift a little on the side of the surface unit that�s by the plug-in. 5. Make sure the surface-unit prongs are pushed into the plug-in as far as they will go. The surface unit will fit into the reflector bowl and be level when everything has been done right.
|
|
|
> |
|