|
|
|
Categories
|
|
Information
|
|
Featured Product
|
|
|
 |
|
|
There are currently no product reviews.
 ;
Great manual, would not have been able to operate my machine without it!!
James Dawson August 18, 2012
;
excellent value & price! Includes everything you need to know about the NN-C777! I would buy this again.
;
Very satisfied! I was searching for several days, but nope; till I discovered your webside and there it was at a very reasonable price. Keep up the good work!
Paul
Flanders
 ;
Generally speaking good copy; a few pages too hard contrast...
Good service and communication.
;
I purchased the unit from a private party and the original owners manual was not available. Having the ability to download it was extremely helpful and clarified operating the equipment immensely. This is a complicated unit and without the manual I would not have been able to maximize it's potential. Thank you.
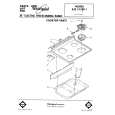
Removing and Replacing Oven Control Knobs: 1 Be sure the knobs are set to �OFF� 2 Pull each knob straight off. 3 Wash the knobs in warm.sudsy water. 4. The knobs are not interchangeable. Make sure you put the adjustable Oven Temperature Control Knob on the right place. and the nonadjustable Oven Selector Knob on the other. Removing surface units and reflector bowls: First. be sure the Surface Unit Controls are all �OFF� and that the surface units are cool. See where the surface units plug into the range? Lift each surface unit about an Inch (2.5 cm) at the edge away from the plug-in (receptacle). Pull the unit straight away from the plug-in. Do not wash surface units; they will burn themselves clean during normal use. Lift out the reflector bowls.
To remove surface unit. lift and pull straight out.
Replacing reflector bowls and surface units: 1 Be sure the surface unit controls are on �OFF.�
;: Hold when surface replacing. unit level
Put the reflector bowls back into their places. Make sure you can see the plug-ins (receptacles) for the surface units through the square hole in the side of each bowl. 3. Hold the surface unit level with the prongs (terminals) pointing at the plug-in. 4. Wrth the prongs started in the plug-in. start pushing in on the surface unit. At the same time. lift a little on the side of the surface unit that�s by the plug-in. 5. Make sure the surface-unit prongs are pushed into the plug-in as far as they will go. The surface unit will fit into the reflector bowl and be level when everything has been done right.
|
|
|
> |
|