|
There are currently no product reviews.
 ;
excellent quality, contains circuits and scan quality, 110 pages
;
It was easy done, and I got exactly what I was looking for.
;
The manuel was exactly what I needed and I received it promptly. Thanks
;
Thanks to Owner-Manuals.com! This manual was exactly what I needed. As Amana was purchased by Maytag and later by Whirlpool, there was no way to receive it from their websites. I was lucky to find this resource.
 ;
Great to be able to set channels again, on an old but stoll fine working TV
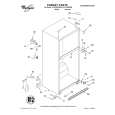
OVEN REAR
HOW TOREPLACE OVEN LIGHTBULB
1. Unplug the oven power cord 2 Remove screw and access panel shown in rllustratron 3. Replace bu!b with a 40 watt appliance with the access panel removed.) bulb only. (Bulb can be seen
ACCESS PANEL SCREW
I
LOCATION OF LIGHT BULB
4. Replace the access panel. The panel has tabs at the top. Insert the tabs In the top of the opemng (behind the enclosure) to hold the panel In place 5. Reolace the screw
CLEANING YOUR MICRO WAVE OVEN
Your microwave oven is designed for easy cleaning. Most soils require only wiping with warm sudsy water. For cooked-on or other stubborn soils, boil a cup of water (250 mL) in the oven for 2 or 3 minutes. The steam will condense and soften the soils. They should be less stubborn after this treatment. Do not operate the microwave oven with soil or any other objects between the door and the oven frame. Do not use abrasive cleansers or scouring microwave oven interior or inside of the door. pads to clean the
15
|