|
|
|
Categories
|
|
Information
|
|
Featured Product
|
|
|
 |
|
|
There are currently no product reviews.
 ;
Absolutely perfect! I've been trying to understand how to use all or at least some of the features of the receiver and especially the remote.
;
Copy of genuine owners/operators manual, very useful
;
The manual was a perfect match and was exactly what I was looking for. I'm very satisfied with my purchase.
;
Thank you for having the manual I needed for an older model Aiwa stero I had found on Ebay --- I wanted the Aiwa because I had tapes and cd's but I did not have a manual as to how to operate the system... I found what I needed and it has enabled me to set the system up for my enjoyment.
;
I wished detailed information of the JBL S310 and here I found it! Very happy with the service from this site!
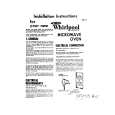
OVEN REAR
HOW TOREPLACE OVEN LIGHTBULB
1. Unplug the oven power cord. 2. Remove screw and access panel shown in illustration. 3. Replace bulb with a 40 watt appliance with the access panel removed.) bulb only. (Bulb can be seen 4. Replace the access panel. The panel has tabs at the top. Insert the tabs in the top of the opening (behind the enclosure) to hold the panel in place. 5. Replace the screw.
SCREW LOCATION OF LIGHT BULB
CLEANING YOUR MICRO WAVE OVEN
Your microwave oven is designed for easy cleaning. only wiping with warm sudsy water. Most soils require For cooked-on or other stubborn soils, boil a cup of water (250 mL) in the oven for 2 or 3 minutes. The steam will condense and soften the soils. They should be less stubborn after this treatment. Do not operate the microwave oven with soil or any other objects between the door and the oven frame. Do not use abrasive cleansers or scouring microwave oven interior or inside of the door. pads to clean the
11
|
|
|
> |
|